Digital Tuning, Inc. KnockBOX Installation in the
Mitsubishi 3000GT VR4 and Dodge Stealth R/T TT
by Jeff Lucius
Introduction
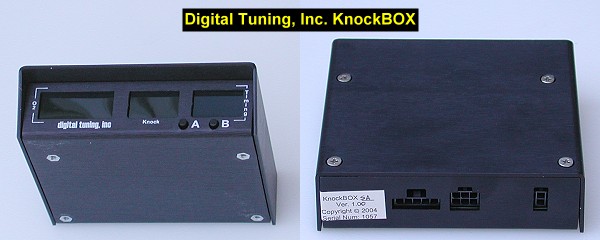
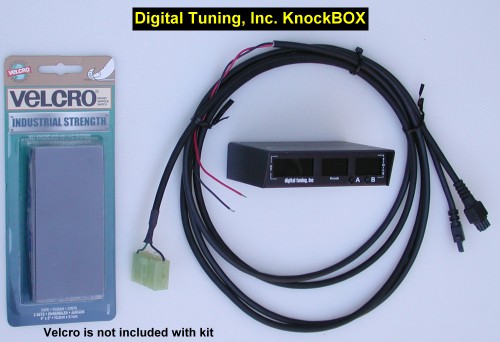
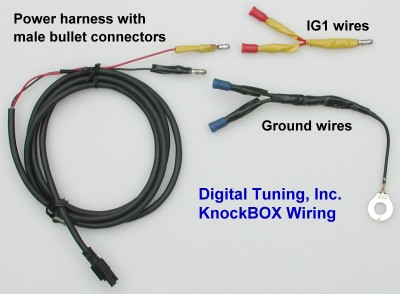
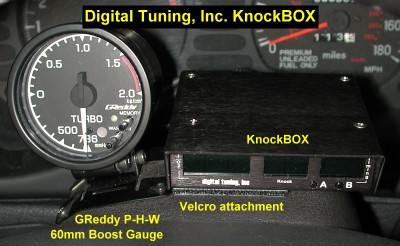
These instructions will help you install the Digital Tuning, Inc. KnockBOX in the Mitsubishi 3000GT VR4 or Dodge Stealth R/T Twin Turbo. There is a ground wire, a power wire (for ignition-switched +12 V) on one harness, and a connector for the diagnostic port on a second harness. There are two versions of the KnockBOX, one that needs the PocketLOGGER and ones that "stands alone". The stand alone version is shown here. Additional installation information can be found at stand-alone box installation and at PocketLOGGER-required box installation. The KnockBOX has three LED displays that show timing advance, knock count, and voltage for the rear O2 sensor. Digital Tuning, Inc. claims future user-installable updates will expand the functionality to include viewing and datalogging of external inputs such as EGT, boost and wideband O2 sensor information. The buttons labelled "A" and "B" are not functional at this time (June 2004).
The tools and supplies needed include: some male and female disconnect terminals (insulated spade or bullet type) sized for 18-20 gauge wire, a wire cutter/stripper/crimper tool, some insulated 18 AWG multi-strand wire, a few cable ties, electrical tape, and a volt-ohm meter. You can decide where to best mount the KnockBOX. I used Velcro to attach it to the top of the steering column cover, next to my boost gauge. If you have not made power and ground connections in your car yet, then take a look at my web page 2-wiring-tips.htm for some tips on making these first connections. Please read all of these instructions before beginning this procedure.
Make the Connections
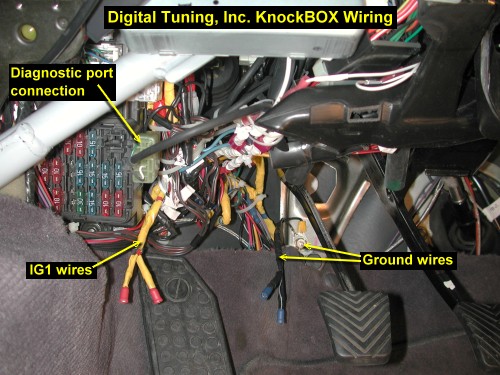
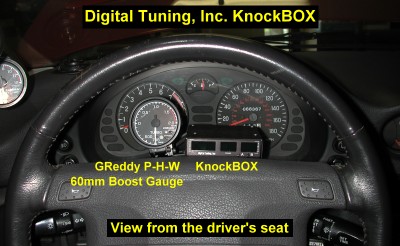
Decide where you want to mount the KnockBOX. It should be within easy view of the driver because its purpose is to give real-time readings of knock, timing, and rear O2 sensor readings. It will also have to be within the reach of its diagnostic connector harness. I placed the KnockBOX on the steering column cover. To make it easy to route the harness from the top of the steering column to the foot well area, I removed the knee protector assembly. See 2-wiring-tips.htm for how to do this. Attach the appropriate connectors the ends of the power and ground wires. Route both harnesses to their destinations.
Mount the KnockBOX
To place the KnockBOX on the steering column cover, I use "Industrial Strength" Velcro (bought at Home Depot). I cleaned the surface of the steering column cover and the bottom of the KnockBOX using brake cleaner (it leaves no residue). After carefully determining the location, I cut the appropriately sized pieces of Velcro and attached them to the two surfaces. Then I plugged the harnesses into the KnockBOX and placed it on the column cover. After being sure everything worked, I put the knee protector assembly back on.
Comments and Suggestions
The KnockBOX goes through a self-check "boot up" sequence as soon as it gets power. If the disgnostic connector is not plugged in dashes are displayed, otherwise, rear O2 sensor, timing, and knock are displayed. It would be nice if DTI would in the future allow us to switch between front and rear O2 sensors using either the A or B button. The real-time knock count display is the main reason I bought this unit. Maybe in future versions DTI will incorporate a peak-hold-recall function for the knock count value.
The correct ignition timing advance is also displayed. I have four different dataloggers for my 1992 Stealth TT. The DTI PocketLOGGER (version 2.03, http://www.pocketlogger.com/), the TMO (version 1.16.02, http://www.tmo.com/), and the MMC (version 1.6n, http://mmcd.meditprofi.ru/) all display values for timing advance at warm idle of 27 to 30 degrees BTDC. The Mirage Corp datalogger (version 1.1k, http://automotive.miragecorp.com/) displays either 16 to 18 or 27 to 30 degrees ignition timing advance at warm idle (it used to do one or the other based on number of items selected; now it always displays 27-30 for my 1992 Stealth TT). The KnockBOX displays 16 to 18 degrees advance at warm idle. My dial-back timing light verifies that this value is correct. Note that when using the dial-back feature you need to divide the dial-back degrees by 2 because of our wasted spark ignition system. When dial-back is at 0 degrees the displayed "degrees" on the engine block are correct. If the timing light displays rpm, then the displayed rpm must be divided by 2 because of our wasted spark ignition.
One last "complaint": When the knock box diagnostic cable connector is plugged in before the engine is started the ABS system goes into diagnostic mode (ABS light is lit on the dash) when the engine starts and the ABS is not available (I tested this the other day in the rain). There really is no reason for this to occur anymore. The Mirage Corp datalogger cable is designed so that the ABS does not go into diagnostic mode even when the cable is plugged in before the engine is started (I have one and have verified this). DTI should be able to design this same feature into their KnockBOX.
Overall, this unit is conveniently sized and fairly priced at $195. However, after I purchased the KnockBOX the Full Throttle Speed Scanmaster 3 became available for $250. The Scanmaster 3 is all that the KnockBox plans to be, and much more such as analog input and configurable logger output and does not cause the ABS diagnostic mode, right now and with serial output to any datalogging software (PC- or Palm-based). You can read about the very cool Scanmaster3 at http://www.fullthrottlespeed.com/. If the DTI does not upgrade and update the capabilities of the KnockBOX, I'll be forced to switch to the Scanmaster 3.
Page last updated July 25, 2004.