Installing and Using CAPS version 3.41
by Jeff Lucius
Introduction
The Mitsubishi Computerized Automatic Parts Search System (CAPS) is used to discover part numbers, applicable models, and effective dates (the range of production dates the part was installed) for a variety of Mitsubishi models, including the Eclipse, Diamante, and 3000GT, all models that use or have used the 6G72 3-L V6 engine. Because there are only minor mechanical and body differences between the 3000GT and Dodge Stealth, nearly all parts are directly interchangeable between these two cars. CAPS includes illustrations and diagrams that can be useful in identifying parts as well as understanding their assembly.
One thing CAPS cannot do is tell you the price for a part. I make available the relevant pages from popular collision repair and estimating guides for 3000GT and Stealth at the two links below. Note that these prices are a bit dated.
For current prices, you can check online at Tallahassee (Capital City) Mitsubishi and Norco Mitsubishi using the part numbers found in CAPS. These dealerships offer some of the best discount prices on new OEM parts. Other discount dealers are listed on my Garage Page.
There have been two versions of this program widely available to 3000GT/Stealth owners, versions 2.66 and 3.41. These tips are for installing and using the latest version, which covers many Mitsubishi models from the 1989 through 2003 models years. If you want to install the older version (2.66), download the files and follow the instructions included with those files. The installation procedure below was performed successfully on four different Dell computers, two running Windows XP Professional (one with SP1 and the other with SP2), one running Windows 2000 (SP4), and one running Microsoft Windows Millenium Edition (ME).
Download the files
The first thing you need to do is get the files.
Download all the files for the latest version (3.41) to a folder. Let's call this download folder c:\newcaps. However, the download folder can have any name and be a subfolder. If you downloaded a large ZIP file then extract it into this folder. You can get a copy of winzip.exe at http://www.winzip.com/.
Install the software
If you downloaded the file wincaps-setup.exe then just get that file running and follow its instructions. Vinny's installation routine will put everything in the right place and get you ready to start using CAPS. Skip the installation instructions below and go to the Using CAPS section.
If you downloaded the individual CAPS v. 3.41 files then follow the instructions below.
Create a folder called C:\WINCAPS\. If you have the older version installed, then this folder already exists and contains files for the older version. The older version maintains its data files in C:\PASEN; do not delete or alter C:\PASEN unless you are removing the older CAPS version from your computer. If you are keeping the older version on your computer, rename C:\WINCAPS\ to C:\WINCAPS_OLD\. If you have a desktop icon shortcut for this older version, right-click on the icon and click "Properties". Change the "Target" and "Start in" folders to C:\WINCAPS_OLD (or whatever you renamed the folder). Now create a new folder called C:\WINCAPS\. Actually, you can install the software on any drive. Just consistently subsitute the drive letter you want to use for "C:". I successfully installed the software on "E:".
In the download folder (c:\newcaps), double click wincaps.zip and extract all the files to C:\WINCAPS. Close winzip. Three folders will be created in C:\WINCAPS - CAPS, PASEN, and WINCAPS. You should use version 8.1 or newer of WinZip for these zip files to extract properly. I had trouble extracting wincaps.zip with version 7.0.
One of the files you downloaded (to c:\newcaps) is InstallWinCaps.pdf. Open this file with Adobe Reader (the reader is available at http://www.adobe.com/support/downloads/main.html). Print this document or keep it handy as a reference.
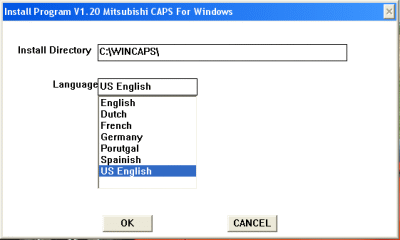
In the download folder (c:\newcaps), double click WinCaps.exe. In the dialog that appears, be sure the install directory is C:\WINCAPS\, select your language (US English for me), and click "OK".
The CAPS Setup dialog will now appear. Fill it in as shown below, and explained in the PDF document, and click "OK".
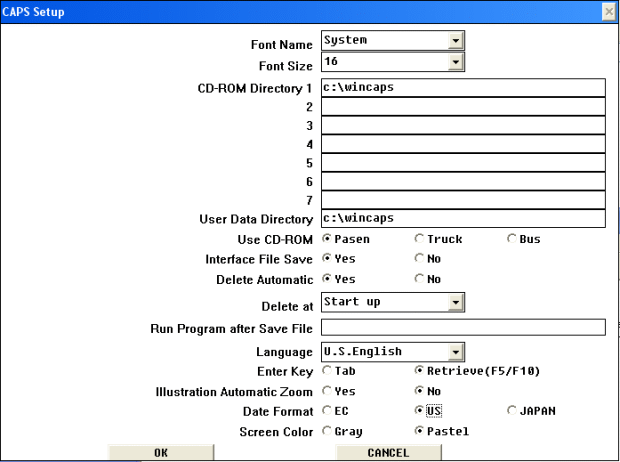
Another small dialog box should appear requesting a password. The password is 11111 (five ones). Installation is now complete. If you did not get the password dialog, start the program (CAPSMAIN.EXE, or maybe CAPS.EXE, in C:\WINCAPS\). Click File in the main menu and select Setup. Be sure the setup is completed exactly as shown above (you may have to enter a directory name) and click "OK". The password dialog should appear; enter 11111 (five ones).
If you want to create a desktop shortcut, go to the C:\WINCAPS\ folder and right click on CAPS.EXE and select "Create Shortcut". Drag this shortcut to the desktop and rename it to WINCAPS (or whatever). Also, the setup program may have created a shortcut in C:\Documents and Settings\username\Desktop\.
Using CAPS
To start CAPS double click on CAPS.EXE in C:\WINCAPS\, double click on the desktop shortcut, or use "Start"-"Programs" and click "CAPS for Windows". After CAPS is running, there are 3 ways to get started.
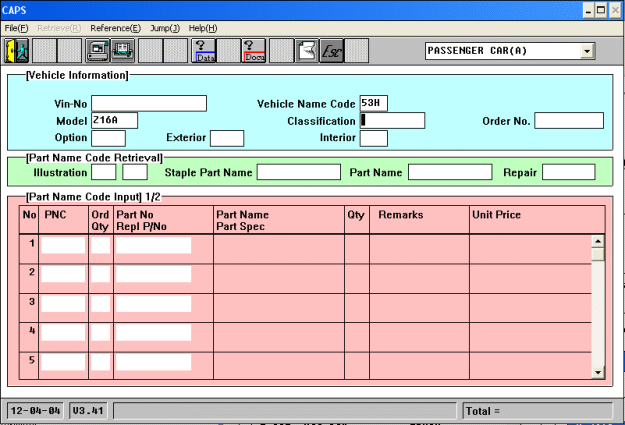
If you want information just for you car, enter your VIN (vehicle identification number) in the white box to the right of "Vin-No" and press Enter. I store my VIN in a TXT file so I don't have to look it up and type it in each time. I get four error dialogs pop up when I enter my VIN. I just click "OK" for each one and continue on. Information about your car will appear in the upper panel of the program, including the manufacture date. Mitsubishi uses a code of sorts for manufacture dates here and when you look up parts. My date is 92.03.2. This means my car was "finished" in 1992, the third month (March), during the second 10-day period during that month. For the 3000GT, model-year production starts during the first 10-day period in June of the year before the model-year and continues through the third 10-day period of May of the model year. For example, 1994 model year cars were produced from 93.06.1 through 94.05.3. The model-year start and stop dates can be different for other Mitsubishi models.
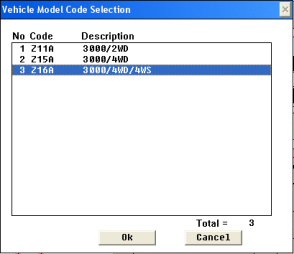
If you want information about a model, not a specific car, double click in the white box to the right of "Vehicle Name Code", in the [Vehicle Information] panel, select your vehicle, and click "OK". Then double click in the white box to the right of "Model", select your model, and click "OK". Alternatively, first double click in the white box to the right of "Model" and both dialog boxes will appear in sequence.
If at any time you want to change the model you are looking at, click once in any of the white boxes in the [Vehicle Information] panel and then click the "ESC" tool bar button or press "ESC" on the keyboard.
One way to find a part is to enter a name or part of a name in the white box to the right of "Part Name". I'll work through an example to find the list of transfer case part numbers installed for the different AWD model years. First, click once in the white box to the right of "Part Name", type "transfer" and press "Enter" on the keyboard.
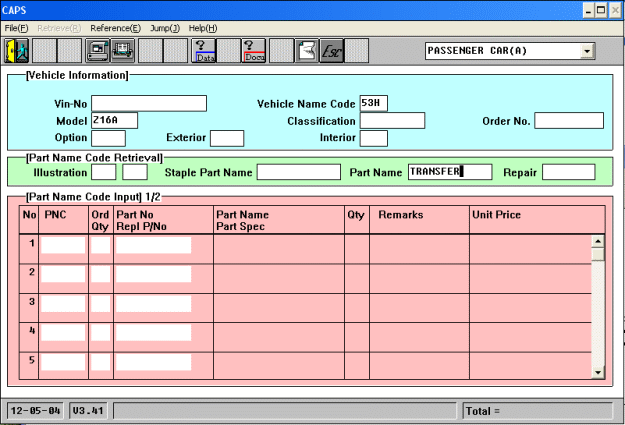
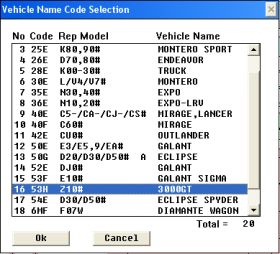
The Part Name Code (PNC) Selection dialog appears. In this case there is only one item shown. In other cases (try "brake") several screens worth of items will be available for you to select from.
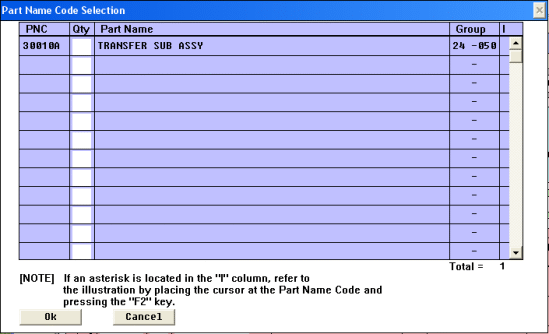
Click once in the box under "Qty" for the item you want and press "F2" on the keyboard. The PNC Selection dialog appears. This is perhaps the simplest example because there is only one item shown. Usually, there are many items indicated. There is a red box drawn around the PNC of the item you selected. If you do not see this box, use the right arrow key in the dialog tool bar to switch to additional illustrations. The four dialog tool bar buttons with magnifying lenses let you zoom in on the upper, middle, or lower third of the illustration (first three) or zoom out to see the whole chart (last button of the four).
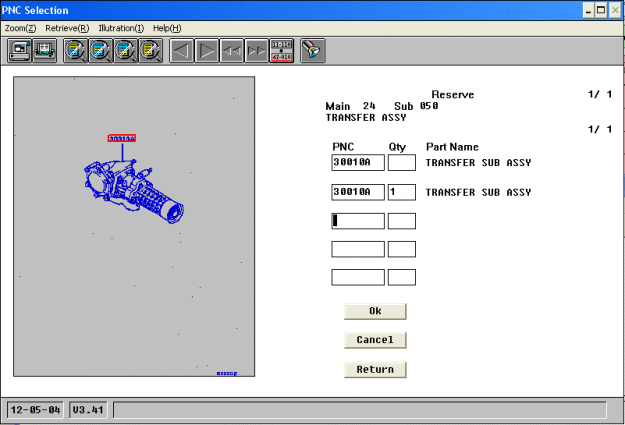
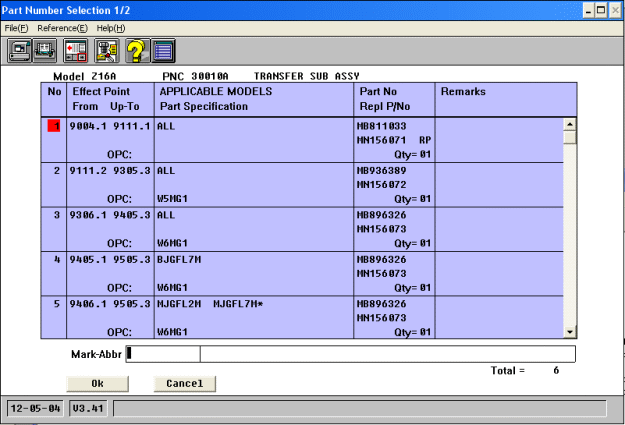
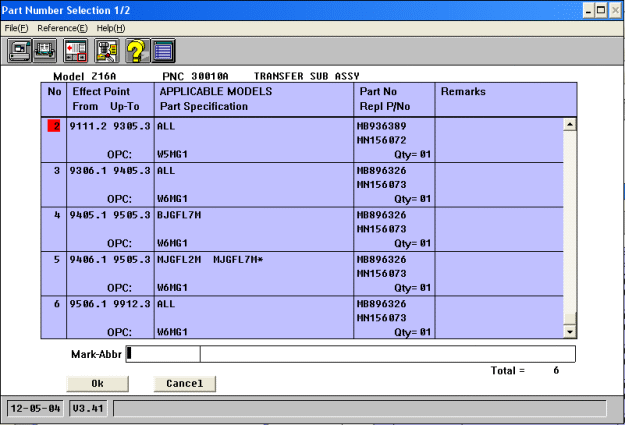
Click once on the red box and the Part Number Selection dialog appears. Note the 1/2 in the title of the dialog shown below. That means there are additional lines not shown in this view. Click in the vertical scroll bar to get to the next "page". The two "pages" are shown below.
If you know the "MB" part number and want to see the illustration or find out about associated parts or changes in the part over the years, then first complete the [Vehicle Information] panel as shown above. Go to the [Part Name Code Input] panel and enter the part number in the first open white box in the "Part No, Repl P.No (part number, replacement part number) column. In the tool bar at the top of the window, click the icon that is 6th form the right. It has a bolt and question mark at the top of it. Note the code under the Part No, PNC column and click the Cancel button. Enter that code in the white box at the start of the row in which you entered the part number. In the tool bar, click the 6th icon from the left this time. It has "PNC" in the upper left corner. If you have a valid PNC, the PNC Selection dialog will open. Proceed as show above in the first method.
What can we learn from the part number information shown? First we can see every original transfer case installed has a current replacement part number (PN). There are 3 different replacement part numbers indicating there are only 3 different transfer cases used. The first replacement PN, MN156071, is used on all 1991 models and on 1992 models through the 9111.1 production date. The second replacement PN, MN156072, is used on 1992 models produced from 9111.2 and on all 1993 models. The third replacement PN, MN156073, was used in all 1994-1999 models, which have the 6-spd transaxle and drivetrain (note the "W6MG1" in the part specification). Because we know that there was a change from an 18-spline output shaft to a 25-spline output shaft for the 5-spd drivetrains (1991-1993 models), we can deduce that this change started with 9111.2 production (1991, November, 2nd 10-day period), in the middle of the 1992 model year. Because my car has a production date of 92.03.2, my 1992 TT should have a 25-spline output shaft from the transaxle to the transfer case.
If you want to select one of the items shown in the dialogs above, click once on that line and then click "OK". The item will be added to the list in the main startup screen.
Another method to get to the same screen shown above is to click in the white box to the right of "Illustration" (in the main startup screen) and find the correct "Main Group" for the part you are trying to find. The "Main Group" screen will appear. You need to select the "Main Group" for the part you want. Use the "zoom in" buttons to be able to read the illustration. Note that it may not always be obvious which group is correct.
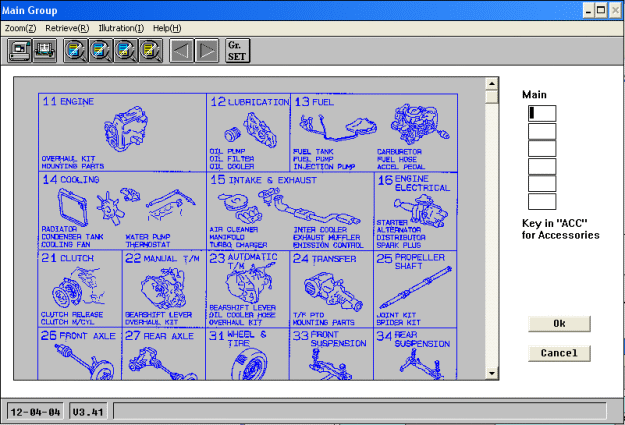
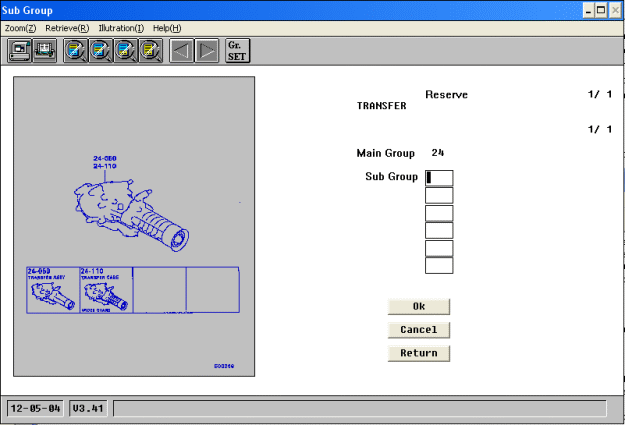
For the transfer case we want Main Group 24. Double click on "24 Transfer". The dialog below will appear. If you double click on Sub Group 050 you will get the same sequence of dialogs shown above. Sub Group 110 will show you the parts for the transfer case that are available from dealers.
Remember to use the zoom-in tool bar buttons and the left and right arrow buttons to look for other screens. You'll get the hang of it.
Enjoy!
Page last updated February 28, 2007.