Wheel Hub Bolt Replacement Tips
for the AWD Mitsubishi 3000GT/Dodge Stealth
(AWD, front)
by Jeff Lucius
Introduction
There are no instructions in the service manuals for replacing wheel hub bolts. The tips on this page show how I replaced a front wheel hub bolt on my all-wheel drive 1992 Stealth. The FWD 3000GT and Stealth models use a combined hub and knuckle so a different approach will be necessary. Also, for the rear wheel bolts it looks like the hub assembly (FWD) or hub/rear axle shaft (AWD) must be pulled to replace a wheel bolt.
To replace a front wheel hub bolt on the AWD model "by the book" requires removing the hub from the knuckle. This is not a particularly complicated operation but you will need to deal with several high-torque nuts and bolts, including the 31-mm (1.22 inch) drive shaft nut (145-188 ft-lbs torque). I chose instead to cut a small notch in the knuckle. I do not think this compromises the structural integrity of the knuckle. But if you are unwilling to do this, or prefer to remove the hub, you do not need to read further. These tips assume that the nut is cross-threaded on the bolt. If the wheel bolt is free spinning in the hub, you will need to figure out how to remove the nut from the bolt.
You might be wondering how I got into this mess. I have removed wheels from vehicles countless times in the last thirty years and never cross-threaded a lug nut. Not even on my 1968 Dodge window van with the reversed threaded lugs on the left side (thank goodness Chrysler abandoned that practice, what were they thinking?). This mishap occured while rotating my tires. I had loosened all lug nuts before lifting the car. I think I had only loosened them one turn, but I wasn't paying close attention (late in the day, hot weather, in a hurry - bad combination). My SSR GT1 wheels use an SSR lug nut which requires a special socket that fits into a standard socket. After the wheels were off the ground, I thought I could remove the nuts faster by using a speed wrench, rather than my standard practice of removing my Stealth lug nuts by hand-turning the socket and extension. A four-way lug wrench always worked just fine on the old Chevy. I am convinced using the speed wrench cross-threaded the lug nut on the wheel bolt you see me repairing here. Maybe I didn't use it carefully enough, but I will always in the future remove and install lug nuts on the Stealth by hand; and, as always, use a torque wrench to perform the final tightening.
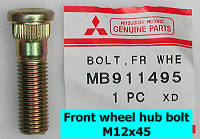
The tools and parts required are a hydraulic jack, a jack stand, two wheel chucks (blocks of wood are fine), lug wrench or the appropriate socket and ratchet for your wheels, a torque wrench that goes up to 100 ft-lbs, a small flat-head tool for some Stealth owners to remove the wheel center cap, 17-mm socket and ratchet (swivel head may be required), 3" socket extension, 2' to 3' breaker bar, a 3' to 4' breaker bar, two feet of strong wire (a wire coat hanger works well), grinding tools (I used a round file and high-speed cutter in an electric drill), a hammer (1 to 3 pounds), safety glasses, and 4 fender washers (5/8" inside diameter, 1.25" outside diameter). Of course, you also need the replacement wheel hub bolt. This is part number MB911495 for the AWD front wheel hub (all years; about $5 list, cheaper at the corner auto parts store and discount dealers). If the lug nut is ruined you will also need a replacement (I had spare aftermarket lug nuts available for my SSR GT1 wheels). Please read through all the instructions before starting this operation.
Replace the Wheel Hub Bolt
1. Remove lug nut and front wheel. Park the car on a fairly level surface and set the parking brake. For a cross-threaded lug nut that does not want to loosen or tighten, you will have to shear the wheel bolt. With the wheel on the ground so that the hub cannot turn, place the lug wrench or socket and ratchet on the problem nut. Slide a larger breaker bar over the wrench or ratchet handle. I used the ~4' long handle of my 3-ton hydraulic jack. Twist the nut until the bolt shears. This took about a 180º rotation in my case and the nut popped right off. If the wheel bolt breaks free in the hub, or is already free-spinning, then you will have to break the nut off the wheel bolt.
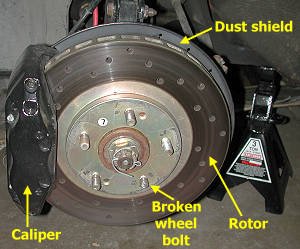
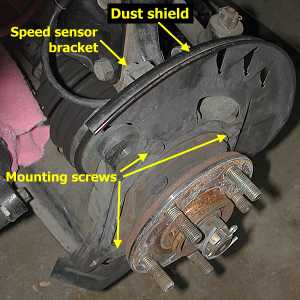
With the problem lug nut removed, loosen the other lug nuts one turn. Place chocks behind the rear wheels, and lift the front of the car (for some ideas see my web page 2-raisecar.htm). Lower the front down onto a jack stand placed under the cross member near the rear bushing for the lower control arm (do not use the bushing itself). Remove the remaining lug nuts and the wheel. The picture below shows the parts you need to remove or loosen next.
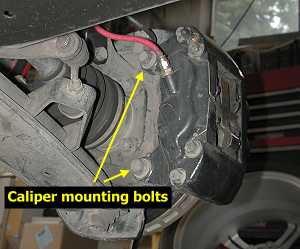
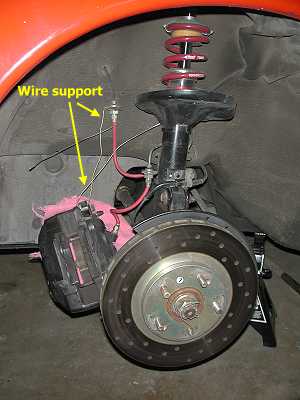
2. Remove brake caliper. Wrap a piece of strong wire or a straightened wire coat hanger around the brake line bracket as shown in the picture below. Remove the two 17-mm bolts that attach the brake caliper to the knuckle. You may need a breaker bar on a swivel-head ratchet to loosen these bolts. Run the wire through the top mounting hole to suspend the caliper. Use a rag to protect painted calipers and be careful not to kink the brake line.
3. Remove brake rotor. Slide the brake rotor (brake disc) off the hub. If you need to loosen the disc first, use a pair of M10 bolts in the available threaded holes. Avoid getting grease or oil on the disc surface and place the outboard side of the disc face down (so the friction surface does not get contaminated on the garage floor). After the disc was removed, I placed lug nuts on the good bolts to avoid any damage to the threads.
4. Loosen dust shield. Remove the 12-mm cap screw from the speed sensor bracket on the back of the dust shield and place the bracket out of the way (tie it off with string if you need to). Remove the three 10-mm cap screws from the front of the dust shield. You cannot remove the dust shield. However, you do need to move it around to keep it out of the way of your work.
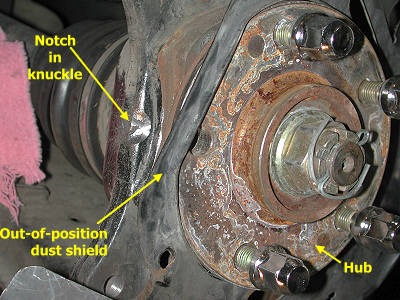
5. Remove wheel bolt. Tap on the sheared end of the bolt with a 1 to 3 pound hammer. Wear safety glasses to protect your eyes. You do not need to beat on the bolt; just keep hitting it mildly until it pops out the back of the hub. There are curved in areas on the forward and rearward edges of the hub and the knuckle that look like they were designed to facilitate inserting the new bolt. You can try to insert the new bolt near these areas but I found on my 1992 AWD knuckle and hub that there just was not quite enough room. The hub is cut away fine; but not the knuckle. If Mitsubishi had just provided a small dished out area about 1/8" deep or shaped the knuckle just a little better you would not have to perform the next step.
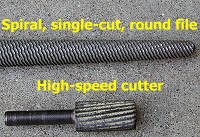
6. Notch knuckle. Grind a notch into the soft iron of the knuckle similar to what is shown below. I started the notch by hand with a large, spiral-, single-, bastard-cut (medium tooth) round file and finished the job with a high-speed cutter in my 3/8" electric drill. Be careful to not damage the brake caliper, brake lines, or rubber boot on the driveshaft. Keep trying to insert the wheel bolt as you progress and stop removing material as soon as the bolt fits into the hub. Be sure to smooth (radius if possible) the edges of the notch to reduce sources for stress fractures.
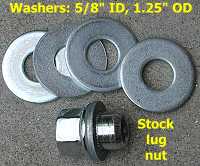
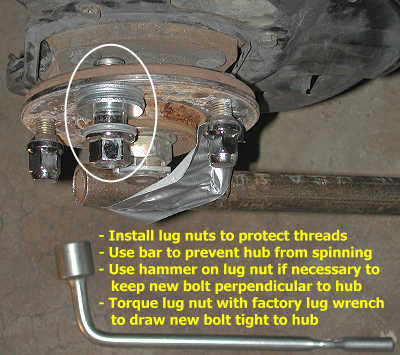
7. Replace dust shield and install wheel bolt. Push the wheel hub bolt in from the back of the hub by hand. Before "pressing" the bolt into the hub, attach the dust shield to the knuckle (3 cap screws) and attach the speed sensor bracket to the dust shield. Now add some fender washers (5/8" inside diameter, about 1.25" outside diameter) over the wheel bolt threads and then attach a factory lug nut. I inserted a 1" diameter breaker bar between the remaining studs to prevent the hub from turning. Some duct tape kept the bar from falling off. Start tightening the lug nut by hand using the factory lug wrench. As the bolt is pulled into the hub, check to be sure that it is at right angles to the hub. This may require temporarily removing the nut and washers. You can use the brake disc to be sure the bolt is perpendicular to the hub (the disc should easiily slide over the bolts if they are aligned properly). If the bolt is not at right angles, put the nut back on and tap the nut (protected by some cloth if you want) with a hammer to align the bolt. Put the washers back on and continue tightening the nut by hand until the bolt head is drawn tight against the back of the hub.
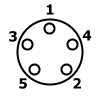 8. Install rotor, caliper, and wheel. Slide the brake disc onto the hub. Carefully remove the brake caliper from the wire and install the caliper. Torque the caliper bolts to 65 ft-lbs (90 Nm) using a torque wrench. Remove the wire and put the wheel back on. Tighten the lug nuts by hand in a pattern similar to that shown in the diagram to the right. You may have to move the wheel a little by hand to get each lug nut seated. At this point, I like to snug the lug nuts a little further using a socket and wrench. Do not torque down the nuts yet. Using your jack, remove the jack stand and then lower the car so that the tire rests on the ground enough to not turn but without the full weight of the car on it. Finish tightening the lug nuts using the pattern shown above to 87-101 lb-ft (120-140 Nm). Do not guess; use a torque wrench! I use 95 ft-lbs. After all the nuts are tight, finish lowering the car completely to the ground.
Page last updated July 6, 2002.