Rear Bumper Replacement
on the Dodge Stealth R/T TT
by Jeff Lucius
Overview
These instructions are specifically for the 1992 Dodge Stealth R/T Twin Turbo but they can be adapted easily for other models. Only a few common tools are needed: #1 and #2 Phillips screwdrivers, 1/4- and 1/8-inch slotted screwdrivers, 10-mm socket and driver with 3- and 6-inch extensions, and a 10-mm open/box end wrench. All pictures are near the end of this document.
Pre-removal
1. Rear inside trim. Remove the rear storage compartment items including all three trim panels. Please see my instructions at 2-rearstorage.htm.
2. Rear combination lights. Remove the 2 Phillips screws, then pull up and to the rear on the rear combination light assembly. Twist the bulb connectors to remove them.
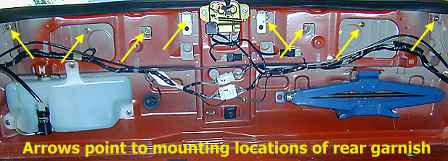
3. Rear garnish panel. Remove the 8 10-mm nuts from the "back" of the garnish and pull it straight out. I put the nuts back onto the garnish bolts to avoid loosing the rubber washers on each stud.
4. License plate and lights. Unbolt the license plate. Remove the license plate lights (2 screws in each) and twist on the electrical connectors to remove them. Remove the bulbs and place them in a safe place.
5. Backup lights. Remove the backup lights (2 screws in each) and unplug the electrical connectors.
Removal
1. Cover. Remove the following sets of nuts or bolts.
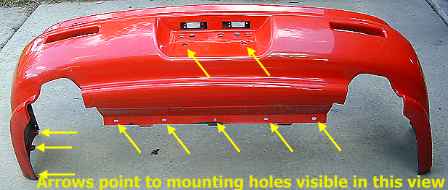
- The 2 bolts that were under license plates; remove the lower ones only, the top are for the hidden license plate bracket.
- The 5 screw-type plastic grommets on the bottom side of the cover; these unscrew just a little then the whole grommet pulls out.
- The 3 10-mm bolts in "mud flap" plastic covers inside the wheel wells.
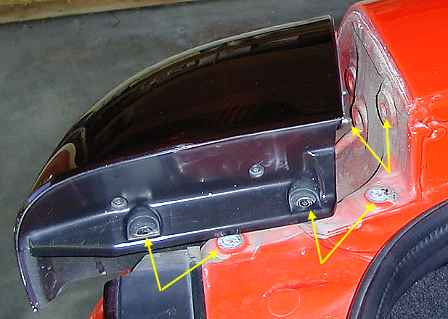
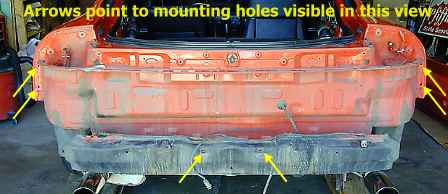
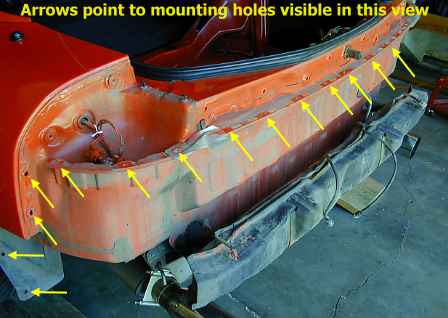
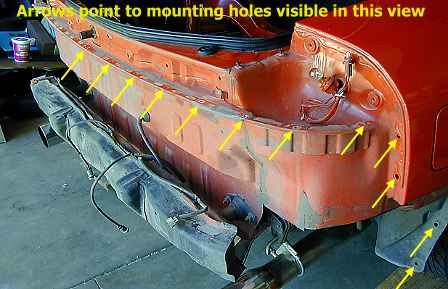
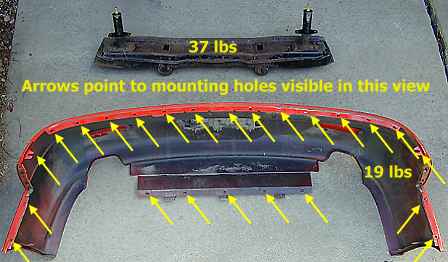
- The 2 bolts (10-mm and Phillips slots) that are straight up into the horizontal upper-outside edges of the cover (see the picture below); a long screwdriver and long extensions can be very handy here.
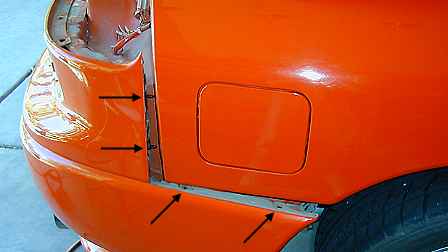
- The 2 10-mm nuts along the vertical upper-outside edges; these are accessed from inside the storage compartment. The ECS control unit must be removed on the passenger's-side and the active exhaust motor on the driver's side (mine was missing due to the ATR exhaust).
- The 15 10-mm bolts along the top edge and the upper plates beneath them.
The bumper cover will now slide off horizontally. It weighs about 19 pounds (8.6 kg).
2. Reinforcement. I did not remove the reinforcement bar. 2 bolts on each side through the bumper absorbers into the unibody hold it on. The assembly weighs about 37 pounds (16.8 kg).
Installation
I was replacing my damaged original cover with a used one from a parts yard so I combined the best parts from both. There are metal plates and mounting brackets attached to the plastic cover. I was amazed at how rust-free the hardware was for my Colorado car compared to the parts I had received from a Pennsylvania yard. I also selected the best light covers and had to make some minor repairs to the wiring harness.
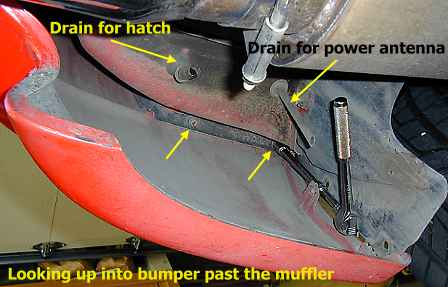
Before putting the cover back on, now is an excellent time to clean out the drain hoses for the liftgate recesses. Loosen the clamps at the top of the hose and slide the hose off. Pull the bottom hose out of the body or slide the hose down through the body. I squeezed out by hand the grime accumulated on the inside and washed it out with water. Make sure there are no kinks in the hose when you install it and add some duct tape to hold it in place.
1. Reinforcement. I didn't actually remove this part but it looks there are only 4 bolts that hold it on.
2. Cover. Slide the cover on horizontally while lining up the posts on the end. I found it easiest to install the bolts and nuts in the following order.
- the middle metal plate on top and start the middle bolt by hand till it is not quite snug. You should notice that the mounting hole for the middle bolt is round while all the others are ellipses.
- The 2 bolts on the back of the bumper that will be hidden by the license plate. These can be tightened.
- The 2 nuts on each side that are put on from inside the storage compartment. Don't tighten all the way.
- The 2 bolts that thread in vertically from under the bumper. Tighten these but be careful to not over-tighten. Now go back and tighten the nuts from the inside of the storage compartment. You may need to apply some pressure to the cover as you tighten the bolts to get the cover to match up best with the body.
- The rest of the top bolts and tighten all.
- The 5 plastic grommets on the bottom lip.
- The 3 bolts in each wheel well.
Post-installation
Now would be a good time to replace all those old light bulbs if you are so inclined. Follow the pre-removal instructions in reverse order.
Page last updated March 17, 2002.