Radio Removal
on the Mitsubishi 3000GT/Dodge Stealth
by Jeff Lucius
Removal
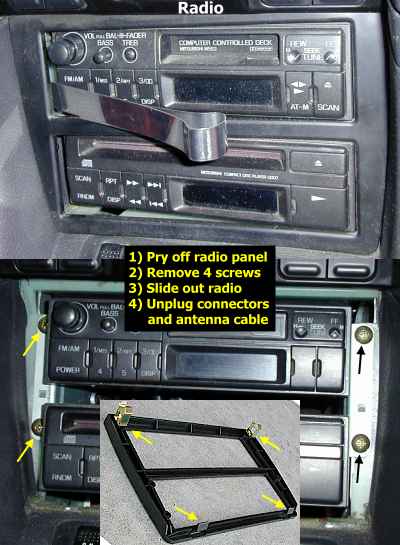
Pry off the plastic garnish that surrounds the radio and CD player. I used a homemade trim tool but a 1/4" slotted screwdriver or similar tool will work. Be careful to not scratch the radio or garnish. Remove the 4 brass screws (#2 Phillips, 3/4" long, 7/16" head) that hold the radio in. This arrangement may be different for other models of radio. Pull the radio out far enough to gain access to the back of it. Disconnect the electrical connections (three for my model) using their release levers (located on top for my model). The antenna cable just pulls out. There is a 10A blade-type fuse on the back of my factory radio. The AM/FM receiver cassette player is Mitsubishi model RX-244CWY (part MB894679). The CD Player is Mitsubishi model CD-305WY (part MB823852).
Installation
Insert the radio part way and reconnect the three electrical plugs and the antenna. Slide in the radio the rest of the way and attach it with its four brass screws. You can snap in the garnish now or wait until you have checked component operation after you are done.
Page last updated December 7, 2003.