Intake Pressure Testers for the
Turbocharged Mitsubishi 3000GT/Dodge Stealth
by Jeff Lucius
Introduction
These instructions are for constructing intake pressure tester adapters for the turbocharged models of the Dodge Stealth and Mitsubishi 3000GT. These designs show four ways to construct an adapter; all are variations on a theme. You can use other combinations of fittings and achieve the same result. I used a large round adapter because I have removed the factory MAS and use a Ford or Granatelli MAS, which has a round shape instead of the factory oval shape.
If you want to remove the factory intake "T" that the MAS attaches to, take a look at Erik Gross's intake pressure tester at http://www.supercar-engineering.com/rubberducky/3S/Maint/TT/IntPresTest/. This method has the advantage of removing the BOV from the system and does not require reshaping the intake "T" opening from an oval to a circle. An oval-shaped pressure tester (a flat, thick aluminum disk) that fits into the intake "T" oval opening is available from 3SX Performance in the "Specialty Tools" section. Rob Beck also sells (or used to) pressure testers; more info here http://www.3si.org/forum/showthread.php?t=206269.
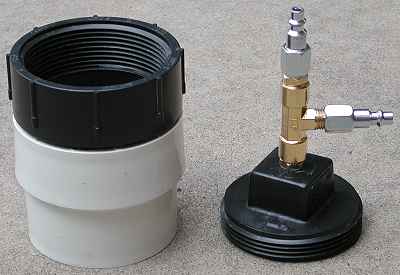
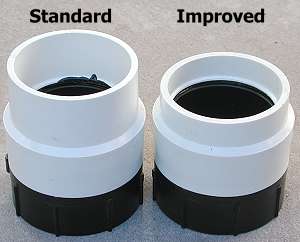
I found the 3-1/2" OD cleanout adapter (large black fitting in the pictures below) to fit a little loose in the intake hose. The 3-5/8" OD adapter fits perfect. I took the intake hose off the engine and into the hardware store to find the parts that fit best. The only reason I used the large black adapter was because I could not find an adapter the size of the white one that was threaded to accept a plug. I also think that the black ABS fittings threaded together better than the white PVC versions. Working quickly, it should only take about 1/2 to 1 hour to make one of these. It will take maybe a day for the silicone sealant to dry.
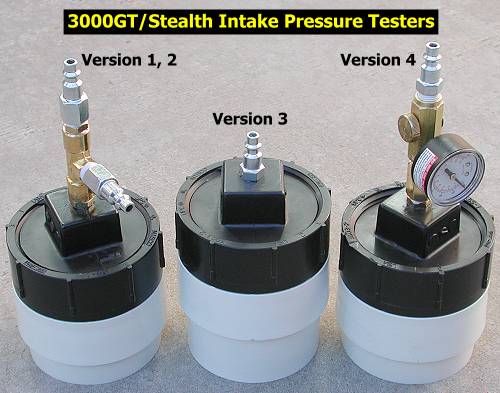
Version 1
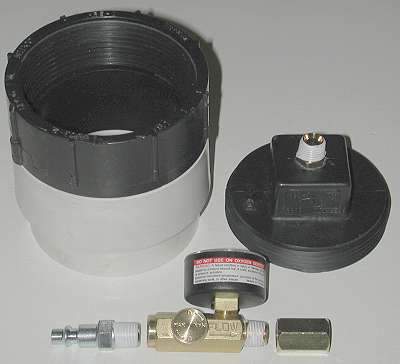
The following parts are needed to make this version of an adapter (see below for variations):
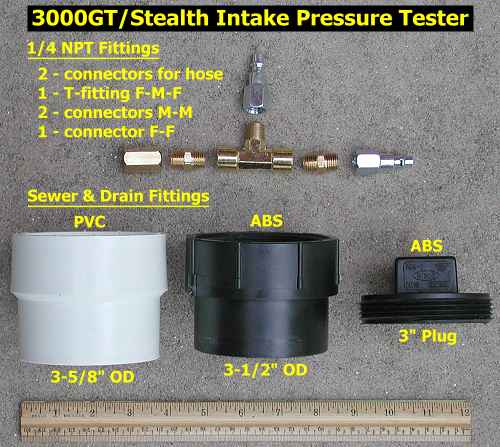
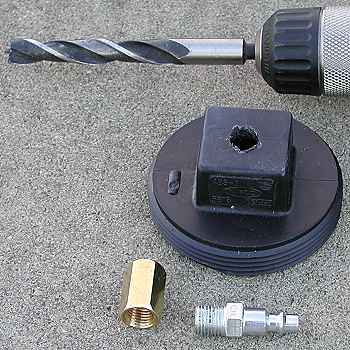
1/4" NPT fittings
2 - connectors for hose and gauge - F threads
1 - T-fitting F-M-F
2 - connectors M-M
1 - connector F-F
Sewer and Drain fittings - PVC or ABS
1 - cleanout adapter 3-5/8" to 3-1/2" [PVC sewer & drain fitting: 3-3/4 DWV x 3-3/4 S&D Adapter]
1 - cleanout adapter 3-1/2" to 3" threaded
1 - 3" cleanout plug
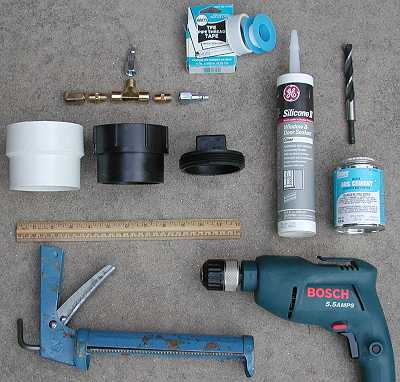
The tools and supplies required are an adjustable wrench (or wrenches sized correctly for the fittings you bought; 9/16" worked for mine), ABS or PVC cement (either is fine), pipe thread tape, silicone rubber sealant (and a caulk gun if required), and a 1/2" drill bit and drill. The brass and PVC/ABS fittings cost me a total of $14. ABS cement costs about $1.40; silicone rubber sealant costs about $2.75 for a 10 oz tube; pfte tape is about $0.80. And, of course, you need an air compressor and pressure gauge for testing.
Construction
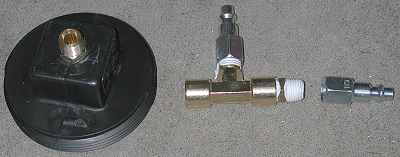
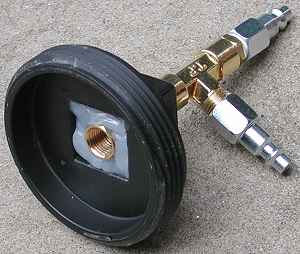
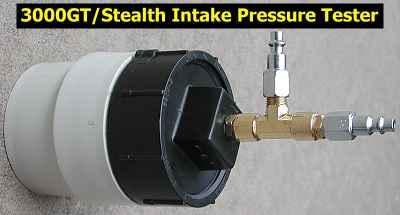
Peel off the store labels and stickers and remove their adhesive with adhesive cleaner. Test assemble the parts by hand, no tools, and then take them apart. The threaded cleanout adapter (black part in my pictures) will only insert a little way into the larger cleanout adapter (white part in my pictures). Apply ABS or PVC cement around the inside of the white adapter where the black adapter fits into it. Immediately insert black adapter into the white adapter. Now it will insert all the way and bond immediately. Drill a 1/2" hole in the middle of the cleanout plug. One of the male-male brass fittings should fit very tightly in the hole. I actually had to "thread" it in with a wrench. Inside the plug, attach the female-female fitting to the few exposed threads of the male-male fitting (I did not use teflon tape here). Tighten with wrenches. Assemble the rest of the fittings seperately. Wrap teflon pipe thread tape twice around the male threads (it takes a piece about 2.5" long) and then tighten the fittings togther with wrenches. Wrap tape around the male threads of the connector in the plug and attach the T fitting to it. Now fill the hole in the plug around the brass fitting with silicone sealant. The sealant will take 24 hours to cure. The plug can be threaded into the cleanout adapter without the use of sealant, adhesive, or tape and make a good seal.
Usage
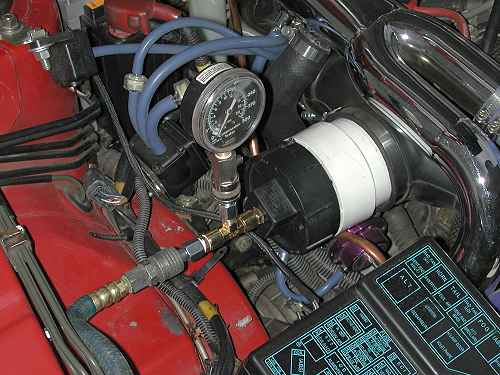
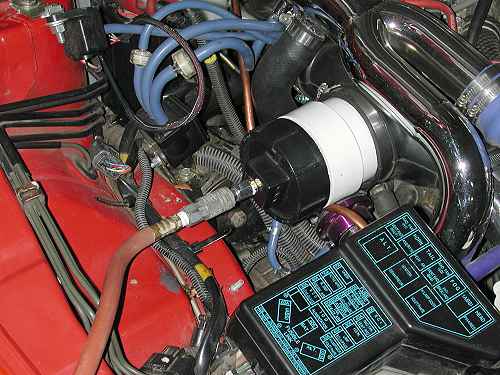
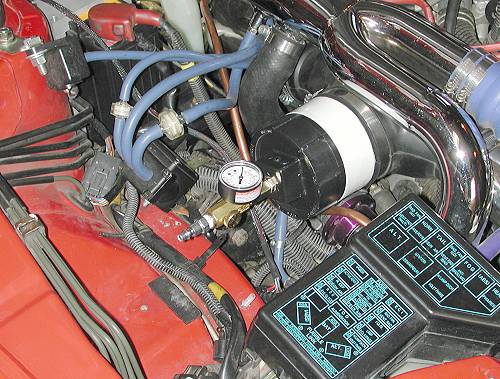
Remove the air filter and MAS. With the stock MAS and stock air filter this takes some work. For my ARC2 setup this required only loosening the hose clamp that secures the MAS to the intake hose. Add the pressure gauge to the pressure tester and insert the assembly into the intake hose and tighten the hose clamp. Connect the compressor hose and observe the results. Do not allow pressure in go above 20-30 psi. There is a concern that the engine will not "seal" the intake track because there is a probablity that some valves are open. I did not have worry about this for the first test. When I added compressed air I heard a huge whoosh. My right (polished aluminum) intercooler was leaking badly (explaining why I could only boost to 16-18 psi with 15G turbos). The weld where the bottom cap attached to the intercooler body was cracked. I first tried to repair the crack with JB Weld. The JB Weld repair cracked as soon as I boosted the engine, discovered the second time I pressurized the system. Professional MIG welding of the intercooler fixed the problem permanently.
Some users have experienced the crankcase pressurizing through the PCV hose attached to the intake hose. If you find this happening (you might notice air escaping around the oil cap or dipstick), you need to disconnect the PCV hose from the rear valve cover and plug the hose. Likewise, the PCV valve may allow air to pass through in the wrong direction into the front valve cover when pressure is high in the intake manifold. the hose can be removed from the PCV valve and plugged. If you do not have a problem with the air entering through PCV system but instead have air escaping past the valves to pressurize the crankcase, you will have to make and install a plate to block airflow either between the plenum and intake manifold or between the throttle body and plenum.
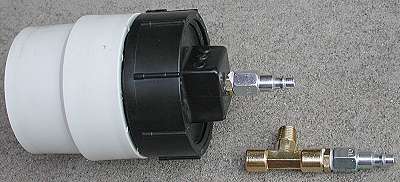
Version 2
For the next round of pressure testing I reconfigured the tester as shown below to have a single fitting. Without a pressure gauge, only allow a little air to enter the system, then withdraw the hose, block the end of the fitting with your finger, and listen for leaks. The third pressure test revealed a loose connection of the intake hose to the rear turbo. I fixed this and tested a fourth time. The only "leak" heard was coming from the angled fitting on the GReddy Type-S BOV. I am not sure if it is supposed to do this or not when there is equal pressure on both the intake and output openings of the BOV. When I covered the BOV and tester fittings with my fingers, the system held air pressure. In all four tests, I never heard any air leaking through the engine.
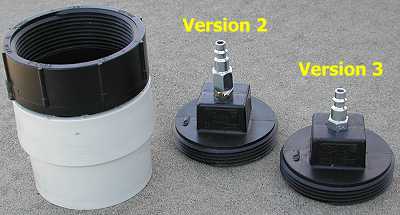
Version 3
I have made a third version of this adapter. It only takes two NPT fittings and the three PVC/ABS fittings. The two 1/4" NPT fittings are a connector for the hose with male threads (the above ones have female threads) for $1.06 and a F-F connector to hold the hose connector in the plug ($1.47). The PVC/ABS fittings cost $1.46 (C/O adapter), $2.48 (C/O adapter threaded for plug), and $0.98 (plug). This brings the cost for parts down to about $7.50, plus the cost of silicone sealant and a little ABS cement (no teflon tape needed with this version).
Version 4
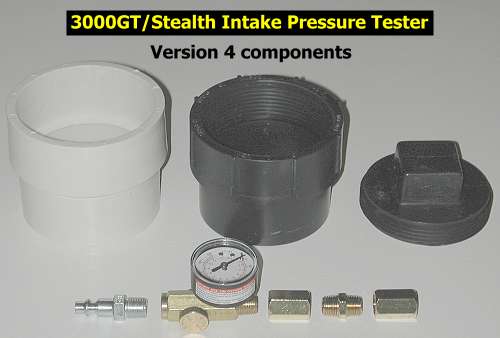
The fourth version of this intake pressure tester is the most expensive but is also the nicest and the most delicate. I incorporate a small Campbell Hausfeld Air Flow Requlator with Gauge (part number MP1042) for $15 into the design. The gauge on the regulator is relatively delicate and will easily crack if dropped. The PVC/ABS parts needed are the same as above, except that I cut off about 0.8" of the C/O adapter that inserts into the intake hose. I had the part milled on a lathe for a clean appearance, but you could probably use a hacksaw or maybe a bandsaw to shorten the fitting. The 1/4" NPT fittings include two F-F connectors ($1.47 each), a M-M connector ($1.19), and a connector for the hose with male threads ($1.06). The total cost for parts is a little over $25 and you will use about $2 worth of materials (ABS cement, silicone sealant, pfte tape, adhesive cleaner). For a more professional look, you can line up the edges of the hexagonal pieces as you assemble them. The knob on the regulator shows maximum and zero flow positions. Note the flow direction indicated on the regulator.
Next, I will try to use a tire valve as the fitting on the cleanout plug so that the tester can be used anywhere your tires can be filled. I'll update this web page after I see if this works or not.
Page last updated August 1, 2006.