Krank Vent Turbo Kit Installation
in the AWD Mitsubishi 3000GT/Dodge Stealth
by Jeff Lucius
Introduction
This web page discusses the PCV system in our DOHC turbocharged Mitsubishi 3000GT and Dodge Stealth engines and the installation of the Krank Vent one-way valves in my 1992 Dodge Stealth R/T Twin Turbo.
 The positive crankcase ventilation (PCV) system on our engines is designed to remove "blow-by" gases (unburnt fuel-air mixture that escapes past the piston rings on the compression stroke) from the crankcase before the gases can contaminate the engine oil or increase the crankcase pressure. Fresh, filtered air is supplied to the crankcase from the intake hose through the left (rear) rocker cover. This fresh air mixes with the blow-by gases and is sucked out of the right (front) rocker cover by the partial vacuum in the intake manifold through a metered orifice (or variable flow valve) called the PCV valve.
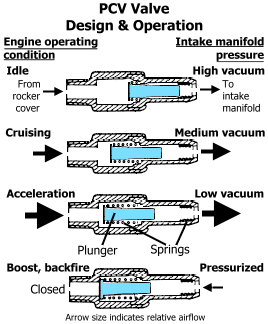
As shown in the diagram to the right, the PCV valve consists of a tapered plunger and two springs, and limits the air flow based on intake manifold vacuum. During idle and deceleration when blow-by gases are minimal, the low pressure (or "high" vacuum) in the intake manifold pulls the plunger against the springs and restricts the airflow through the valve. During cruising and low-load acceleration when blow-by gases are moderate, medium vacuum in the manifold only pulls the plunger part-way and allows more air through the valve. During acceleration and heavy-load operations when blow-by gases are at their maximum, low vacuum in the intake manifold allows the springs to keep the plunger "back" for maximum airflow through the PCV valve. In the case when the intake manifold becomes pressurized, such as during boost on turbocharged engines or during backfire, the plunger's seat is forced against the valve case preventing air from entering the crankcase. During extremely-high engine load the volume of blow-by gases may exceed the ability of the PCV valve to draw the vapors out of the crankcase. In addition, when the manifold is pressurized blow-by gases cannot leave through the PCV valve. In both of these situations the blow-by gases flow out of the rear rocker cover into the intake hose.
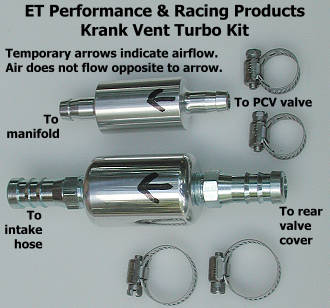 ET Performance & Racing Products developed and now manufactures and sells one-way valves that modify the operation of the PCV system and prevent air from entering the crankcase through either the PCV valve or the intake hose. The ET Performance Krank Vent Turbo Kit consists of two valve assemblies (one larger than the other) and four hose clamps. The smaller valve assembly installs in the hose between the factory PCV valve on the front rocker cover and the intake manifold. Molded into the bottom of the intake manifold is a small passage that directs the aerosol from the front rocker cover into the six ports. The larger valve assembly installs in the hose that connects the rear rocker cover to the intake hose. Both valves allow air to flow through them in only one direction. When the Krank Vents are installed, air will flow only away from the rocker covers, maintaining a partial vacuum in the crankcase at all times. ET Performance claims this partial vacuum
- increases engine power and response a few percent because power is not wasted compressing air in the crankcase on the downward piston stroke,
- improves piston ring seal because of the increased pressure differential across the ring, and
- reduces emissions.
The tools needed to remove the stock PCV hoses are a 14-mm wrench and some pliers or forceps. You might want to loosen the fuel rail, the fuel rail wiring harness, and the triple clamp on the plenum to make some room to work in. If so, you need a 10-mm and 12-mm socket and ratchet (or wrenches). I recommend using new silicone hose rather cutting the stock PCV hoses. The old hoses are probably stiff and prone to cracking. In addition, by using new hose you can return to the stock setup if you want. An 8-mm inside diameter (ID), thick-walled hose is the right size for the "upper" hose (the one that attaches to the PCV valve). I did not have an 8-mm ID hose but the 6-mm ID hose I had worked fine; the fit was little tight but it worked. A 10-mm ID, thick-walled hose works well for the "lower" hose (the one that attaches to the intake hose). My Links Web Page has a section for "hoses and clamps".
Discussion
Before you begin installation, you need to decide if you are going to retain the stock PCV valve. As discussed above, the stock PCV valve meters the air that leaves the rocker cover. A problem might occur during very high boost where the stock PCV valve leaks air into the rocker cover, pressurizing the crankcase. The purpose of the new Krank Vent in this upper hose is to totally prevent air from flowing from the manifold into the rocker cover. In this respect, it should cause no harm to leave the stock PCV valve in place. In fact, ET Performance has recommended this in their posts on the 3SI message board. The major reason for not retaining the stock PCV valve is because the small opening through the PCV valve assembly may limit the airflow out of the rocker cover when the intake manifold is not pressurized or the valve may get dirty and block airflow out of the rocker cover.
Perhaps a more important decision is whether to install the larger Krank Vent in the direction that ET recommends or even to install it at all. Installing the larger Krank Vent with the flow direction away from the rocker cover guaranties that fresh, filtered air will not enter crankcase from the intake hose, and that the crankcase will always be under partial vacuum. Installing the Krank vent in the opposite direction is not desirable because pressurized air would be prevented from leaving the crankcase during boost situations, when blow-by gas volume is at its greatest. The third alternative is to not install the larger Krank Vent. This would allow the PCV system to function as it was designed to, but would eliminate the main benefit that ET attributes to the Krank Vents, that is, a partial vacuum in the crankcase at all times.
Before you start
If you decide to retain the stock PCV valve then you do not need to worry about its replacement. If you do not want to use the stock PCV valve then you need to either drill out and remove the spring and valve body inside assembly or replace the valve assembly entirely with a suitably sized barbed metric pipe fitting. You might be able to get the barbed fitting from http://www.rtec.ch/. I decided to drill out one of the extra PCV valves I had (I still had a functioning PCV valve, which is a good thing as you will read shortly). Alternately using 1/8" and 7/32" drill bits I worked on the insides of the valve assembly clamped into a bench vise. This task will take quite a while and at times seems like it will not work, but you can make it happen. I used dental cleaning tools, forceps, a punch and hammer, a long bolt, and vicegrips to eventually extract the springs and valve body. Be sure to wash out the metallic dust inside the PCV housing with some spray degreaser (or maybe "WD-40") and compressed air if available. The picture below shows the removed parts and size of the entry passage before and after drilling.

I installed the drilled-out PCV valve assembly with the Krank Vents. As soon as I started the engine I heard a rather annoying "whistling" type of noise coming from the front (belt area) of the engine. This phenomenon has been reported by others. And as other have discovered, when I pinched the hose between the drilled PCV valve and the smaller Krank Vent the noise went away. The noise is caused by the crankcase being under a high vacuum because fresh air cannot enter through the larger Krank vent and the stock PCV valve is not present to reduce airflow at idle. The noise goes away as soon as the dipstick is raised (hard to do), which allows unfiltered air directly into the crankcase, or the oil cap removed (it must be pryed off), which allows unfiltered air directly into the rocker cover. I did not identify the source of the "whistling", but it must be from some passage that allows unfiltered air into the engine.
I replaced the drilled PCV valve with the good one I had and that got rid of the noise and high crankcase vacuum at idle. The good PCV valve functions as it is supposed to; the valve body rattles when shaken and air flows through only one way when tested by blowing in the ends. I have left my system like this for now. I don't see any advantage for the high crankcase vacuum at idle (people report the noise goes away during acceleration), and my primary reason for installing the Krank Vents is to prevent airflow the wrong way through the PCV valve, especially under boost. I need additional testing and observations before deciding to leave the larger Krank Vent in place or not for the long term.
UPDATE: Dec 17, 2003. After living with both Krank Vents and the factory PCV valve for a year and a half I can say the following. I have not really noticed any difference in my engine as far as crankcase pressure is concerned. I still need to use an extra gasket on the oil filler cap to keep it from leaking. There is no discernable difference in idle or during power operation. While the Krank vents have produced noticeble improvements for some owners, for me the little (upper) Krank Vent gives me piece of mind that no intake manifold pressure can enter the rocker covers, but the system does not produce any dramatic change in crankcase vacuum.
Installation
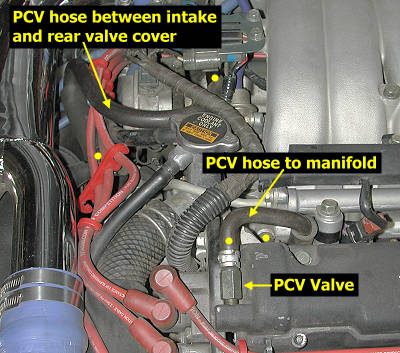
1. Identify the stock hoses. The picture below shows the two PCV hoses you need to remove. I placed yellow dots in the picture where the ends of the hoses are. I found it helpful in creating a little extra working space to disconnect the triple clamp on the plenum (top center in picture) and the fuel injector wiring harness (black plastic piece that runs across the front of the plenum), and to loosen but not remove! the fuel rails. Leave the fuel rail bolts with a few threads attached.
2. Install smaller Krank Vent. Using pliers or forceps, squeeze the clamp at each end of the hose and slide it off the nipple and back onto the hose. If needed, use a large flat head screwdriver to help pry off the hose at the intake manifold. Set the hose aside and save it. Before installing the crank vent, blow through the ends to determine which direction the air flows. I used a black marker to indicate airflow direction on the Krank Vent (as shown in the picture above). These easily rub off later. To attach the smaller Krank Vent as shown in the picture below, I attached a 2-1/2" to 2-5/8" piece of 6-mm ID, thick-walled hose to the "output" end using the supplied hose clamp; the arrow you drew on the Krank Vent points to the "output" end. An 8-mm hose would work better but I did not have any at hand. On the "input" end I attached a 3-1/2" piece of hose with a hose clamp. Place a hose clamp (not supplied by ET Performance) over the shorter hose and slide the "output" end hose onto the nipple at the intake manifold (here is where an 8-mm ID hose would work better). Secure it with the hose clamp. Be sure the arrow you drew on the Krank Vent is pointing toward the intake manifold and away from the PCV valve. Place another hose clamp on the free piece of hose and slide the hose onto the PCV valve. If it kinks at all, remove the hose, cut a little off, and slide it onto the PCV valve again. The final arrangement is shown below with yellow dots added indicating the ends. When you are finished with the front or upper Krank vent, you can re-attach the fuel rail and fuel rail harness.
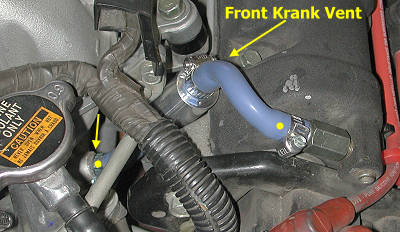
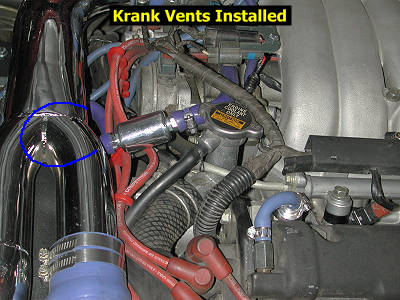
3. Install larger Krank Vent. Remove the lower PCV hose. It should easily slide off the nipples at either end. As with the other Krank vent, draw an arrow on the larger Krank Vent indicating which way air flows through it. Find a suitable place to locate the Krank Vent. One idea is shown below. Cut the 10-mm ID, thick-walled hoses for length so that they do not kink. The blue line draw in the picture below gives you an idea of how I looped the lower piece of hose to avoid kinks. The arrow you drew on the Krank Vent points away from the rocker cover and to the intake hose. I used the supplied hose clamps to secure the hoses to the Krank Vent, but just slid the hoses onto the rocker cover and intake hose without clamps. Re-attach the triple clamp onto the plenum.
4. Test. Start the engine and inspect the system for leaks. If you used a drilled-out PCV valve or replacement barbed fitting, you may notice a "whistling" sound. This is eliminated by using a stock PCV valve or removing the larger Krank Vent.
Page last updated December 17, 2003.