Ground Control Adjustable Height Springs Installation
on the AWD Mitsubishi 3000GT/Dodge Stealth
by Jeff Lucius
Introduction
These instructions are for installing the Ground Control adjustable height spring kit on the all-wheel drive and all-wheel steering 1992 Dodge Stealth Twin Turbo. For other models, you may have to improvise a little.
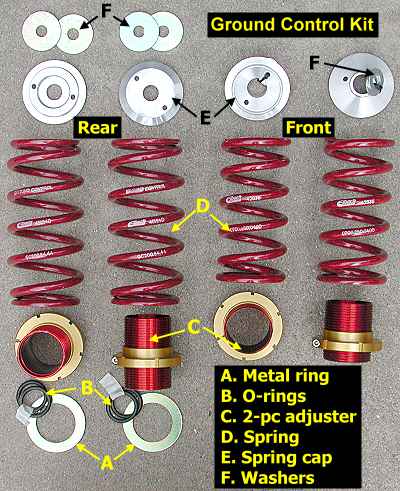
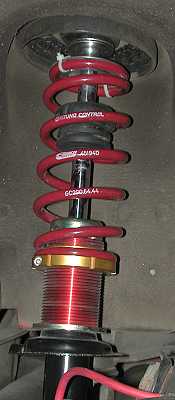
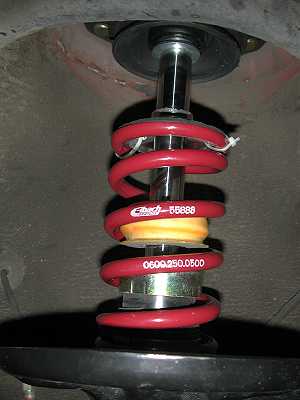
There are two different sets of front springs in the pictures below. The first set I purchased were Eibach 700.250.0400. These springs are 7" long and have a 2.5" inside diameter (I.D.) with a 400 lb/in spring rate. These springs are too long. GC is not to blame for his because I requested 400 lb/in springs and shorter springs have higher rates. I then bought from them another set of springs, 600.250.0500 ($55 each spring). These springs are the correct length, 6" (the shortest Eibach springs GC sells), with a 2.5" I.D. and 500 lb/in spring rate. The ride is very similar to stock. I think 600 lb/in springs would be even better (600.250.0600); some track enthusiasts use 700 lb/in and even 900 lb/in springs.
The rear springs were part number GC 200.64.44 (also Eibach springs) with a 200 lb/in spring rate (again at my request) and 8" length.
For my 1992 Steath TT the stock spring rates are 218 lb/in front and 157 lb/in rear. To keep the same F/R spring rate ratio the following combinations would be needed: 500/360, 600/432, 700/504, 800/576, 900/648. I plan to change my too soft 200 lb/in rear springs to 350 lb/in springs. To summarize, you want 2.5" I.D. springs front and rear. The front springs should be 6" long and the rear springs should be 8" long.
For those of you looking to save weight, the stock rear shock assembly weighs about 15 lb and the stock front strut assembly weighs about 26 lb. The GC setup will save you about 3 lb on each rear assembly (12 vs 15) and about 9 lb on each front assembly (17 vs 26). That's 24 lb total. Hey, every pound helps on these cars!
Read all of the instructions and look at the pictures before you begin. I assume you have already removed and disassembled the struts and shocks. I have some instructions for doing this at this link 2-shockremoval.htm. The tools required to just install the GC springs are a flat head screwdriver and hammer, large slip-joint pliers and a strip of thin rubber 1/2" by 4" (like from a tire inner tube), 19-mm-deep socket, a socket wrench, 19-mm box-end wrench, a hacksaw, a utility knife, and a little grease.
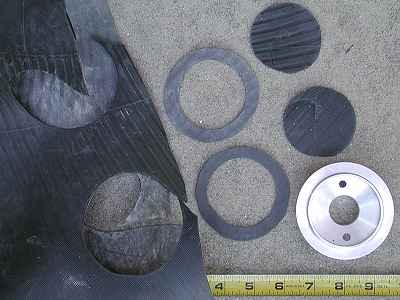
One thing I did that was not in GC's instructions was to add rubber rings to cushion the top caps and some rubber strips for the front adjusters. I cut out these from an old tire inner tube I had laying around. You will need some cable ties to fasten the cap to the spring.
Before you begin, measure the height of the car. Convenient places are the wheel well openings above the center of each wheel and for Stealths the ends of the bottom of the side air dam (near each wheel well). My car had been on jack stands for 6 months when I added the GC spring kit and so I didn't have "before" measurements. I did measure a friend's stock 1992 Steath TT. It had these measurements. Wheel wells: 27.5" front, 27.75" rear. Bottom of side air dam: 6.75" front, 7.125" rear.
Rear Shocks
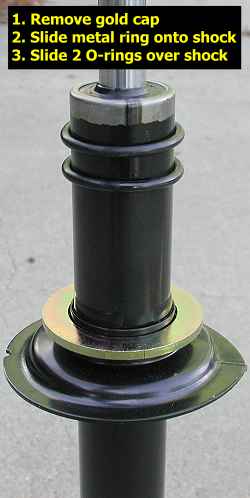
1. Gold cap. Use a hammer (and maybe a flat head screwdriver or similar tool) to knock the gold cap off the shock. Just tap gently along the bottom edges.
2. Metal ring. Slide the metal ring onto the shock until it rests against the spring perch. If the spring perch is resting at an angle to the shock body, gently tap the spring perch until it is at right angles to the shock.
3. O-rings. Slide the two O-rings onto the shock body. These rings will center the 2-piece adjuster on the shock and keep the adjuster from rattling.
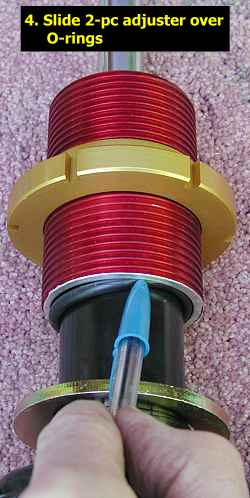
4. 2-pc adjuster. Slide the 2-piece adjuster over the O-rings. I did not find a way to keep the o-rings nicely spaced under the adjuster. I used a pen to push the O-rings back under the adjuster. Stiff cardboard works also. Slide the adjuster down until it contacts the metal ring.
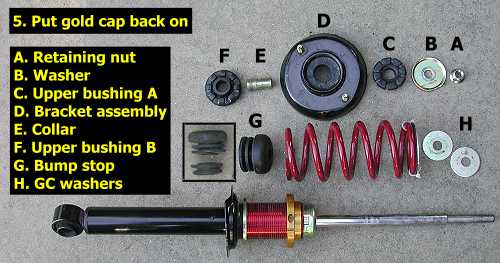
5. Gold cap. Put the gold cap back on. Tap it gently into the adjuster. It should slide inside the adjuster maybe 1/8 to a 1/4 inch or so. The gold cap keeps the adjuster centered on the shock and keeps it from rattling. The cap should fit tight against the shock body. There should be about 8-3/8" of the thick part of the shock rod exposed above the cap. Also try to get the caps on both shocks seated the same distance into the adjuster.
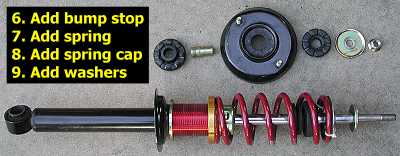
6. Bump stop. GC suggests cutting the rear bump stop in half. I cut a little less than half off, just the bottom two rings. Slide the shortened bump stop onto the thick part of the shock rod.
7. Spring. Slide the spring onto the shock and adjuster and over the bump stop.
8. Spring cap. Place the rubber ring on the cap and slide them both onto the top of the spring. Use two cable ties to fasten the cap to the spring. The rubber ring and the cable ties will reduce the chances of the cap rattling against the spring.
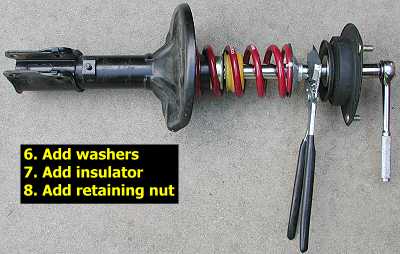
9. Washers. Add the two large washers that GC supplies with the kit. These washers have a 2-1/2" outside diameter and just a little less than 9/16" inside diameter. These washer replace the cup assembly that is no longer needed. The washers keep the bracket assembly from sliding down the rod.
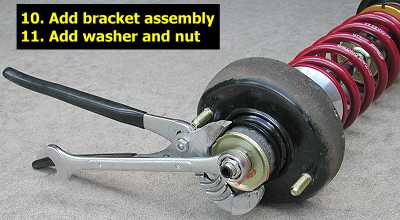
10. Bracket assembly. Remove the soft spring pad that is inside the bracket assembly. It serves no purpose now that the stock spring is removed. The bracket assembly is still needed since it secures the top of the shock to the car. Insert upper bushing B into the bottom of the bracket assembly. Note that it only fits correctly one way. Slide the collar into the assembly and bushing. I installed new shocks with the GC springs. One of the collars that came with the new shock was longer than the original one. I didn't notice this until I had the shock installed and attempted to re-connect the ECS connector. I had to remove the shock and swap in the original collar. Just something to check. Add upper bushing A to the bracket assembly sliding it over the collar. Slide the whole assembly onto the shock.
11. Washer and retaining nut. Add the washer and retaining nut. The washer is notched to fit the shock rod and enables you to tighten the retaining nut without spinning the rod. Use large slip joint pliers to grasp the straight edges of the 2-1/4" washer while you tighten the 19-mm retaining nut with 14-18 ft-lb of torque (20-25 Nm).
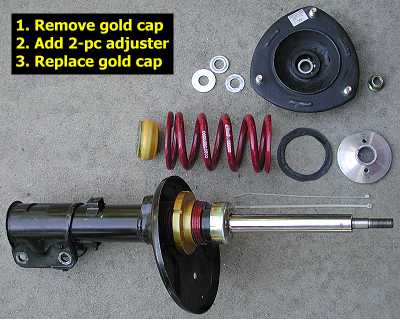
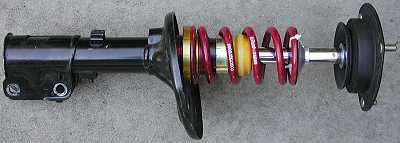
Front Struts
1. Gold cap. Knock the gold cap off the strut using gentle taps with a hammer.
2. 2-pc adjuster. Cut a strip of rubber (like from a tire inner tube) that is about 1/2" x 2-1/4" and about 1/16" thick. Place the rubber strip between the adjuster and the strut body as you slide the adjuster onto the strut. The adjuster will sit down into the "well" created by the lower spring seat. I don't care for this arrangement but didn't see a practical way to change it. Maybe a large metal ring like GC uses for the rear shocks. Quite a bit of the threads on the adjuster are made unavailable because the adjuster sits so deep into the spring seat.
3. Gold cap. Put the gold cap back on and tap it down with a hammer. Unlike the rear shocks, the gold cap does not fit inside the adjuster.

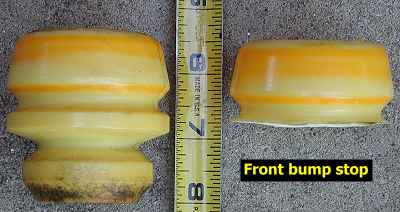
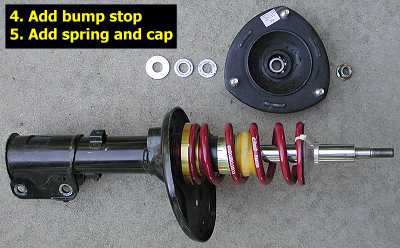
4. Bump stop. GC recommends cutting about 1" off the bump stop. Using a utility knife I cut about 1-1/4" off. Slide the bump stop onto the strut rod.
5. Spring and cap. Assemble the spring, rubber ring, and the spring cap together and slide them onto the strut. The rubber ring has an inside diameter of 2-3/8" and an outside diameter of 3-1/4". Use two cable ties to secure the cap to the spring.
6. Washers. GC says to remove the upper spring perch and replace it with two washers. This is both good and bad. As with the rear shock, the rod part of the strut turns freely in the strut cylinder. Unlike the back shock, which uses a notched washer near the retaining nut to secure the rod when tightening the nut, the upper spring perch is used to hold the rod secure while tightening the nut. The upper perch must be removed to keep it from rotating with the rod and jamming into the fender and possibly binding the struts. GC supplies two medium-sized washers to replace the upper perch. The bearing in the aftermarket insulator I had to use (see below) is not quite as wide as the stock insulator bearing. This required me to use three washers, instead of two, so that the retaining nut did not bottom out on the threads before hitting the insulator bearing. I applied a little grease to each side of the washers.
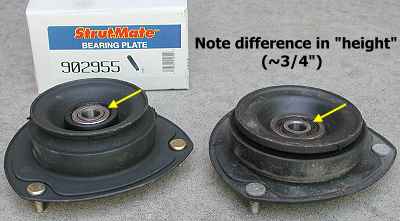
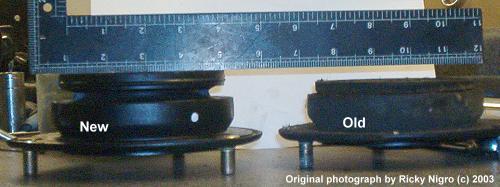
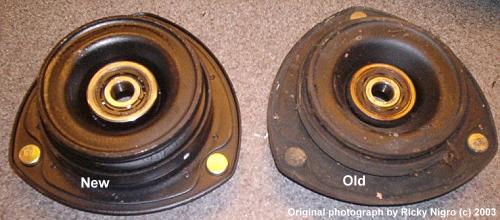
7. Insulator. The insulator is also called the upper plate or bearing plate. The insulator has a bearing in the middle of it to allow the strut to rotate when the wheels turn side to side. When this bearing wears, the strut can bind after the wheels are turned to one side or the other. This will cause the steering to pull in the direction most recently turned. Replace the insulator if you suspect the bearing is worn. A worn bearing will feel "rough" when you turn it by hand. A new bearing turns very freely and smoothly.
8. Retaining nut. Add the 19-mm retaining nut. Because the upper spring perch was removed an alternate method must be employed to keep the rod from turning as you tighten the nut. I used a strip of rubber wrapped around the rod and slip-joint pliers. The service manual says to apply 56 ft-lb (78 Nm) of torque to the nut. I was able to apply only a few ft-lb of torque. I figure that since the upward force applied by the stock spring is missing the nut does not need to be as tight. Still, it would be best to periodically check this nut by removing the cover on the top of the strut in the engine bay. After about 4000 miles of use the retaining nut has nut loosened.
Adjusting the car height
After installing the GC spring kit and putting the wheels back on, you need to adjust the car for height. Raise the car a little with a jack to remove pressure from the shock or strut. The adjuster has a ring on it with a 3/16" alan head bolt in it to tighten it to the threaded cylinder of the adjuster. Each full turn of the ring raises or lowers the car 1/8 inch. Loosen the ring's bolt. Turn the ring to lower or raise the car. Tighten the ring's bolt. Lower the car and check the height. You need to drive the car for a few miles to settle the springs in. Check the height again and adjust the corners as necessary. I set the driver's side 1/8" higher than the right side to compensate for me sitting in the car. I also set the back to be about 1/2" higher than the front. I did not want the car to sit super low, just about 1 inch lower than stock.
When you test drive the car be sure to listen for any noise coming from the struts and shocks. With the extra rubber pieces I used with the installation, there were no rattles or other noises.
I did have some non-spring related steering problems before and after switching to the GC springs. The car wanted to pull to one side or the other depending on which way the car turned last. The steering was also very sensitive to the long wheel "ruts" common on the streets. It turned out that the front strut insulators were bad. The insulator (also called a top plate or bearing plate) bearings were worn out and felt rough when turned by hand with the insulator off the strut. I needed these insulators fast and could not wait for the local Mitsubishi dealers to special order this item. List price is about $61 each. I was able to buy some aftermarket insulators. These insulators mount the same as the stock ones but with one very notable difference. The distance from the base of the bearing, which sits on the strut rod shoulder, to the mounting surface is about 3/4" longer than the stock distance. This makes the front of the car sit 3/4" higher! Fortunately I was able to lower the car this amount with the 6" GC springs. However, this "lift" could not be compensated for with the stock struts and springs. I would recommend the stock insulators over these aftermarket ones and will switch back eventually.
After you are happy with the height of the car you should have the alignment checked. With just a 1" drop and with careful removal and replacement of the struts and shock, my car did not need any alignment adjustment.
Page last updated September 26, 2003.