Fuel Filter Upgrade
for the Mitsubishi 3000GT
and Dodge Stealth DOHC Models

by Jeff Lucius

Introduction

SX Performance Fuel Filter (P/N 41002) 
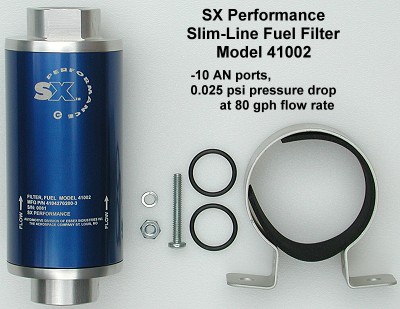
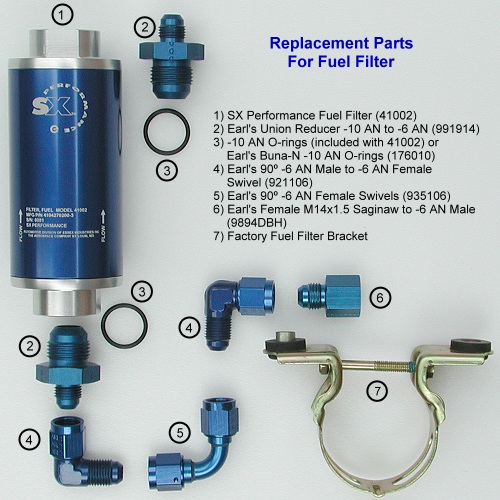
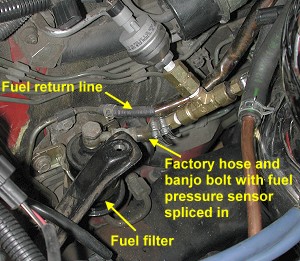
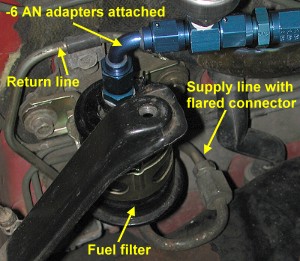
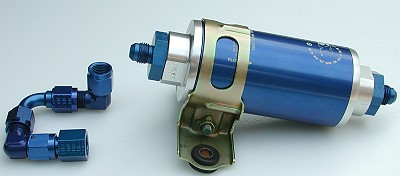
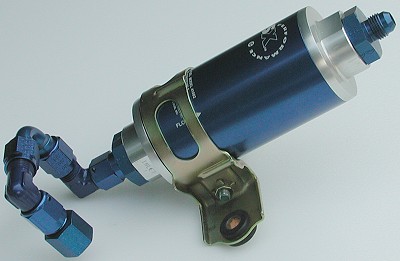
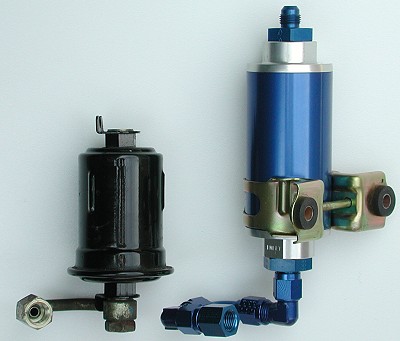
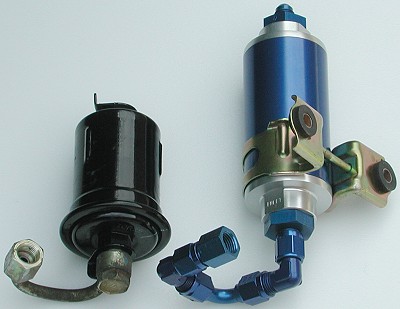
These instructions show how to remove the factory fuel filter and replace it with the SX Performance Slim-Line Fuel Filter (Model 41002). By changing the adapters that thread into the filter's ports, other in-line filters can be used, such as Earl's In-Line Fuel Filter, which uses -6 AN or -8 AN fittings. When deciding on the filter's port size, remember that the factory fuel rails have an inside diameter that varies between 5/16" and 3/8" (-6 to -7 AN) and that the high-pressure fuel line from the tank to the filter is equivalent to -5 AN or -6 AN.

The main reason to upgrade from the factory fuel filter is to decrease the pressure drop across the filter and near the filter. I selected the SX 41002 in part because SX publishes a chart showing the pressure drop versus volume fuel flow. Using 80 gallons per hour (gph) as a typical maximum amount of fuel our engines would flow during high boost (say 20 psi or more), the SX fuel filter has a pressure drop of only 0.025 psi. According to a post on 3SI.org, the NAPA/WIX brand OEM replacement fuel filter for our cars has a pressure drop of 2.5 psi at 300 gph. Because pressure drop changes with the square of the volume flow, the WIX filter should have a pressure drop about 0.178 psi at 80 gph. By itself, the pressure drop across the factory filter is not large. However, combined with the pressure drop in the supply lines and the smallish banjo bolt attachments to the filter, total pressure loss between the fuel pump and the fuel rails could amount to several psi. Upgrading the fuel filter reduces to nearly insignificant at least one source of pressure loss. Replacing the banjo bolts with -6 AN (or larger) fittings also reduces pressure drop. Remember that as the filter element catches particles, pressure drop will increase for any filter as the filter becomes a flow restriction in the system.

Fuel filters that can be used with the same basic setup as shown here include the following.
This web page shows how to replace the fuel filter and the small curved part of the supply line just below (and before) the fuel filter. My web pages below show how to replace other sections of the fuel system in the engine bay.
Please read all of these instructions before beginning this project, and plan ahead for parts. Once you have the parts in hand, this project should only take you a few hours.

Parts and Supplies

The key to being able to replace the curved fuel line below the filter is adapting to the flared metal supply line. The factory connection uses a cone (or inverted flare) and flare connection for sealing as shown below. The thread designation for the factory connection is M14x1.50. Earl's Performance supplies an adapter that provides a solution, though hardly a perfect one. General Motors used Saginaw-type fuel line and fuel rail ends on many of its cars. The 5/16" Saginaw fitting uses a M14x1.5 thread. The 3/8" Saginaw fitting uses a M16x1.5 thread. Earl's makes an adapter (9894DBH) with a female M14x1.5 Saginaw fitting on one end and a -6 AN male fitting on the other. As shown below the blue Earl's Saginaw adapter does not have the cone required to make a factory-type seal. However, the outer edge of the flare does seal well enough to prevent leaks if sufficient torque is applied. I need to thank Bill Ma and Mike Chapleski on the Team3S email list and Erik Arentzen on the Colorado DSM email list for providing this tip.

Detail of flared fuel line    Cone and Saginaw comparison

You will, of course, need an aftermarket fuel filter. I choose the SX Performance 41002, available in red, black, blue (shown), or purple, because of its price ($90 included shipping from http://www.importpoweronline.com/), its disposable 10-micron paper filter or available re-usable 60-micron stainless steel filter, its machined 6061-T651 aluminum alloy body with hard anodized finish, its AN ports, and its extremely low pressure drop (less than 0.15 psi at 200 gph). To connect the filter to the supply lines you will need some AN fittings. I used adapters from Earl's Peformance Plumbing (owned by Holley). Some adapters are also available from Aeroquip (owned by Eaton) and Russell Performance (owned by Edelbrock). The picture below identifies all the parts I used. The SX filter comes with -10 AN o-rings and a bracket. I used the factory fuel filter bracket to hold the filter. Unfortunately, this bracket is not sold seperately by Mitsubishi; it is supplied with the factory filter. If the filter you choose uses different ports, such as -6 or -8 AN or 1/4" NPT, or you want to use larger fittings, such as -8 AN, you will need to substitute with the appropriate fittings. You may also want to purchase a package of Earl's conical seals (169106 for the -6 AN ones; not shown).

Replacement parts

You can buy AN and NPT fittings at the stores below either online or by phone. Shop around to compare prices and be sure to check on availability. Look in your local Yellow Pages under "Auto Peformance ..." for local shops that carry Earl's or Aeroquip fittings. That is how I found Motorsports Supply (listed below). Their prices are similar to or less than the lowest online prices and they are in the Denver, CO metro area where I live. They will ship anywhere in the USA. For online stores I recommend Summit Racing and Pit Stop USA.

       Summit Racing     Aeroquip, Earl's, Russell     http://www.summitracing.com/
       Fluid Systems Engineering     Earl's     http://www.fluidsystemseng.com/
       Pit Stop USA     Earl's     http://www.pitstopusa.com/EARAN-ANADAPTERS.asp
       Earl's Performance Products     Earl's     http://www.earlsperformance.com/
       Jeg's High Performance     Aeroquip, Earl's, Russell     http://www.jegs.com/
       Pegasus Auto Racing Supplies     NA     http://www.pegasusautoracing.com/
       American Street Rod     Earl's     http://www.amstreetrod.com/
       Tognotti's Auto World     Earl's     http://www.tognottisautoworld.com/Products/Earl/default.htm
       Behrent's Performance Warehouse     Earl's     http://www.behrents.com/
       MotorHead.com     Earl's     http://www.motorhead.com/
       ANPlumbing.com     Earl's     http://www.anplumbing.com/
       Baker Precision     Aeroquip     http://www.bakerprecision.com/aqp.htm
       Stock Car Products     Aeroquip     http://www.stockcarproducts.com/aqpindx.htm
       The Race Depot     Aeroquip     http://www.theracedepot.com/product9.htm
       Racer Parts Wholesale     Aeroquip     http://www.racerpartswholesale.com/
       Martel Brothers Performance     Aeroquip, Russell     http://www.martelbros.com/

      Motorsports Supply, 7200 E.54th Place, Commerce City, CO 80022 (phone: 303-287-1731, 1-800-288-5202)


In addition to the fuel filter and AN fittings, the tools and supplies required for this project include pliers, a Phillips screwdriver, 10-mm, 12-mm, and 19-mm (3/4") sockets and wrench with 3" and 6" extensions and maybe a breaker bar, 14-mm flared-nut wrench (open end will work also), 19-mm (or 3/4") open end wrench, -6 AN aluminum wrench (or 11/16" open end wrench), 28-mm open end wrench (or adjustable end wrench), threadlocking compound, rags, and maybe some penetrating oil that loosens frozen or rusted parts (I used Kano's Aerokroil).

Permatex Threadlocker Blue #24200    Kano Aerokroil

Costs (round numbers, no tax or shipping)

Remove Factory Fuel Filter and Curved Supply Line

1. Relieve fuel line pressure. In the rear storage compartment, remove the carpet (velcro and push-in clips) and particle board floor (4 Phillips screws), or just raise these up out of the way. Remove the spare tire. Remove the passenger's-side storage bin (3 Phillips screws). Remove the access cover to the fuel pump (4 Phillips screws). Separate the electrical connector by pressing down on the tab and pulling that piece toward the front of the car. You do not need to remove the blue filter as suggested in the picture below. In the left picture, the wires shown running under the assembly cover are part of my fuel pump re-wire and are not present on a factory setup. Try to start the engine. It should not start because the fuel pump has no current to it.

Fuel pump assembly cover    Fuel pump wiring harness connector

2. Remove the battery and washer tank. Remove the negative cable from the battery. Be sure you have any security codes that might be needed when the battery is disconnected. Follow the instructions and tips on my web page 2-batteryout.htm to remove the battery, tray, and washer tank. This will give you good access to the fuel filter area. If you have an open-element air filter, you may want to remove it to avoid possibly damaging it while working in this area of the engine bay.

3. Remove end of fuel return hose. Place a rag under the hose to catch gasoline that remains in the rails, pipes, and hose. This gasoline should not be under pressure. However, as a precaution wear safety glasses to protect your eyes when removing the hose. Because gasoline contains carcinogens such as benzene, avoid letting the gasoline contact your skin. And, of course, do not ingest gasoline and avoid breathing fumes. Gasoline is poison as well as a fire hazard. Use pliers to loosen the clamp and slide it off the hose onto the pipe behind the fuel filter. With the pliers gently twist the hose and pull it off the metal pipe. I do this to give me plenty of room to work in. You could try leaving the hose attached if you want.

Fuel filter and return hose    Fuel filter

4. Remove the line on top of fuel filter. If the factory banjo bolt is still present, use a 19-mm (or 3/4") wrench below the banjo bolt to hold the filter steady, loosen the banjo bolt using a 19-mm (or 3/4") socket and wrench. If the bolt is frozen or rusted to the filter, you can use a breaker bar to break the bolt free. Alternatively, you could spray the connection with penetrating oil first. After the bolt is loose, remove it so as to not drop the two crush washers that are on either side of the supply line.

Fuel filter top supply line

5. Uncouple the flared supply line connection. There is a good chance that this connection has never been loosened since the car was built or since the last time the fuel filter was changed. I could not easily loosen the connection with two wrenches. I then spray the connection with penetrating oil. I let Kano's Aerokroil soak for about a minute or so and was able to easily loosen the connection. Use a 14-mm flared-nut wrench (a 14-mm open-end wrench will work but you risk rounding the edges of the nut) on the smaller male fitting and a 19-mm open-end or flared-nut wrench on the larger female fitting. The female fitting does not rotate. Hold the 19-mm wrench steady and push the top of the 14-mm wrench toward the driver's side of the car.

6. Remove the fuel filter. After the flared fittings have been disconnected, remove the two 12-mm bolts in the bracket that attaches the filter to the firewall. Don't drop or loose the metal inserts in the grommets that the bolts go through (one is visible partially out of the grommet in the "Replacement Parts" picture above). Remove the filter and its bracket from the engine bay. Using a 10-mm socket or wrench, loosen the long screw that holds the filter in the bracket and slide the filter out of its bracket. Save the bracket for use with the SX filter. I do not know the size of the Earl's filter and so do not know if the bracket will also work with that filter. The bracket should work with the Aeromotive and K&N filters. My fuel filter was replaced when I had the engine rebuilt about 9,000 miles and 4 years ago. So it still looks pretty new. You may want to clean an older bracket up, and maybe even paint it, before re-using it with the SX fuel filter. On the other hand, you really cannot see much of this bracket once the battery is installed.

Install the New Parts

If you prefer, you can loosely assemble all the parts, including temporarily placing the filter in the bracket, to check for fitment in the engine bay. I can guarantee that the battery tray and washer tank will fit with the filter installed as shown below. Because I have moved my battery to the rear compartment, I don't know if the taller SX fuel filter will contact a fullsize battery in the engine bay.

1. Assemble the AN fittings and adapters. AN fittings seal either by the close contact of the 37º flared ends or with o-rings. The threads themselves never seal AN connectors. Also, never use thread sealant or tape on AN threads. Because there is no flared base in the ports on the SX fuel filter, o-rings are required to make a seal. SX supplies two -10 AN o-rings that will work on the Earl's union reducers. If you need additional o-rings, you can buy a package of -10 AN o-rings from either Aeroquip or Earl's. Either BUNA-N synthetic rubber or Viton will work. Both compounds are compatible with most fuels. However, Viton is more scuff resistance, can last longer, and has a higher temperature rating (400ºF instead of 275ºF for the BUNA).

Assemble the fittings that replace the curved fuel line as shown below. Start threading all fittings by hand. Then tighten the swivel parts with wrenches so that pieces can no longer be moved with respect to each other. I caution against applying too much torque to the fittings. However, the bottom line is that tight enough is when the fittings do not leak.

For the union reducers, apply a little clean engine oil to the o-ring and gently roll the o-ring across the threads until it rests in the non-threaded area next to the hexagonal. By hand, thread the union reducers into the ports on the fuel filter. Use a wrench to tighten until the hexagonal rests against filter's case.

Remove the screw from the factory filter bracket. Slide the bracket over the SX fuel filter. Leave a small margin of the colored part of the anodized case visible below the bracket. Insert the screw a little way by hand. Apply some thread locking compound to the threads. Maintaining the correct position of the bracket on the filter, tighten the screw with a 10-mm socket or wrench until the filter is secure. If desired, align the filter so that the labels face the engine bay. Be sure the inserts are still in the grommets. Be sure the flow direction marked on the filter is pointing up, away from the assembly of fittings.

Fuel filter assemblies

Attach the assembly of fittings to the base of the fuel filter. Tighten the female swivel on the 90º fitting so that the assembly cannot move with respect to the filter. Tighten just a little more. The completed assembly should look as shown in the pictures below.

SX fuel filter and fittings assembled

Comparison of SX and factory fuel filters1

Comparison of SX and factory fuel filters2


2. Install the new assembly in the engine bay. Maneuver the assembly into position. Start with threading by hand the male flared end fitting into the female Saginaw connector. Remember only the smaller male connector rotates. Be very careful to avoid cross-threading the aluminum Earl's adapter. You should be able to thread the male connector almost completely into the female Saginaw connector. Tighten the connector some more with wrenches but do not completely torque at this time.

Insert the outboard bolt in the bracket and align the bracket against the firewall so that you can start threading the bolt by hand into the other bracket already attached to the firewall. Continue threading the bolt until you can see the threads stick out on the back of the firewall bracket. Repeat with the inboard bolt. Now torque these two bolts down and the flared connector into the Saginaw connector.

Attach the fuel line to the top of the filter. For my setup, I already had a 90º -6 AN adapter with female swivels on each end attached to the factory filter using an adapter in the filter. As I explain more in the next section, I had trouble with this 90º adapter leaking.

SX fuel filter installed

3. Pressure test. Double check that all the fuel lines are connected up, especially the return line hose if you disconnected it earlier. Re-connect the electrical harness connector at the fuel pump in the rear storage compartment. Use the fuel pump check terminal to supply voltage to the fuel pump to pressurize the lines before starting the engine. If your battery was installed in the engine bay, bring it over close to the engine, perhaps sitting it on a table, bench, or chair. Remove the cap from the fuel pump check connector and insert a small paper clip. Connect a small-gauge jumper wire (14 to 18 ga is fine) with alligator clips on the end to the paper clip and to the positive battery terminal (or just touch the jumper wire to the battery positive terminal when ready to pressurize). Be sure you protect the positive cables from contacting the car body or anything metallic in the engine bay. Use an automotive jumper cable to connect the negative battery terminal to either the negative (ground) battery cable or other good ground location in the engine bay. You should hear the fuel pump running. Carefully inspect your work for leaks - look, touch, and smell. Repair or rebuild any connection that leaks and repeat this test.

If your battery has been moved to the rear compartment or you have re-wired the fuel pump directly to the battery, you will have to connect the battery to the positive and negative cables in the engine bay or rear compartment so that the fuel pump has current to it. You will still need to connect the fuel pump check connector as described above. Because my battery is in the rear compartment, I used my old Dyna-Batt to supply current to the check connector as shown in the lower picture below. I connected one end of the negative (ground) jumper wire to the firewall ground screw and one end of the positive jumper wire to the fuelpump check connector. I then just touched the ends of the jumper wires to the correct terminals on the battery.

Check connectors

Fuel pump check connector

The above procedure works great if there are no leaks. However, unlike my installation of the other fuel lines and related components in the engine bay, I had several leaks with this setup. I revised my test procedure as follows. After everything is ready for current and with the negative jumper touching the battery terminal, just touch the positive jumper wire briefly (less than a second even) to the positive battery terminal. You should hear the fuel pump run. Inspect the new plumbing for leaks. I saw fluid creep out along the threads of the flared-Saginaw connection. I kept tightening this connection until the leaked stopped. Keep touching the positive cable to the battery to slowly build pressure in the lines.

On top of the filter, I had a major leak problem with that 90º adapter. I ended up installing Earl's conical seals at both ends and torquing the swivels ends untill I basically could not turn them anymore. The leak did eventually stop. The picture below shows a conical seal on the reducer union on the filter. Even though Earl's adapters and fittings are designed to be re-used, maybe I just should have used a new 90º adapter. To make the repair, I reduced line pressure by loosening the fitting a little and catching the fuel in a rag. Then I would dry all the areas that leaked and start re-pressurizing the system again.

Generally, you will need to fix the uppermost leaks first before being sure there are no leaks in the lower fittings. I did have to tighten the lower fittings some more also. You must be absolutely sure you have no leaks, no matter how long it takes or how much repair work is required. You must get this right. You simply cannot have fuel leaks in the engine bay. After I finally got all the leaks stopped I pressurized the system several times and let it sit over night to be absolutely sure. Note that there is still a chance that a leak might occur during boost when line pressure may go as high as 70 psi. So be sure to check for leaks again after you get the car back on the road.

Check connectors

Post-installation

1. Put stuff back. Reconnect any hoses or wiring harness connectors and brackets you have disconnected. Re-install the battery tray and washer tank, being sure to reconnect the harness at the washer pump before you have lowered the tray completely and to reconnect the harness up by the check connector and the fluid tube. Re-install the MAS and air filter if removed (don't forget to re-connect the MAS wiring harness). Install the battery, connecting the negative cable last.

Because my battery is in the rear compartment, I assembled the tray as far as shown below so you can see the position of the SX filter with respect to the tray.

Guel filter onstalled 1    Fuel filter installed 2

Catalogs

Earl's 1999 Product Catalog (14 MB): misc/earls_full_catalogue.pdf
Parker Fluid Connectors pipe fittings and adapters catalog (0.9 MB): misc/pipe_fitting_and_adapters.pdf
Truechoice catalog (8.5 MB); go to page 100 for Earl's fittings and adapters: misc/truechoice_catalog.pdf
Essex Parts catalog (2 MB): misc/earl's_fittings&hoses.pdf
Russell Performance Automotive Catalog: http://www.russellperformance.com/automotive/autocatalogpdf.htm


Back Home Forward

Except for the small gif and jpg images, the content, images, photographs, text, and multimedia displayed are Copyright © 2000-2004 by Jeff Lucius and K2 Software. All rights reserved. No part, section, image, photo, article, or whole of this site may be reposted or redisplayed without permission of the authors.
Page last updated December 18, 2004.