Fiamm AM-80 Horn Installation
in the AWD Mitsubishi 3000GT/Dodge Stealth
by Jeff Lucius
Introduction
I did not like the stock horns on my 1992 Dodge Stealth R/T Twin Turbo. The horn sounded, well, like the typical Japanese import, and not very loud. I installed a pair of FIAMM Technologies horns that greatly improved the sound (more like the typical V8 Chevy I grew up with) and the loudness.
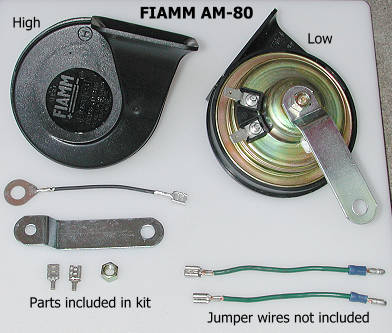
The factory horns on my Stealth were manufactured by Knight Horn in Taiwan. The information stamped on the housing states the model is KM-80 with a 12-volt, 3-amp current draw, and 105 dB loudness rating. These replacement horns by FIAMM are manufactured in the USA. They have a 12-V, 5-A current draw, and 125 dB loudness rating at 1 meter. The horns can be mounted using one or two wires and come with a bracket and nut, ground wire (for single wire installation), and two female quick disconnect uninsulated terminals. Using homemade jumper wires, these horns easily replace the stock ones with no modification to the car.
The factory horns have a list price of about $25 for the high-note horn and $35 for the low-note horn. I purchased these horns through JC Whitney for $14.36 each. They have catalog item numbers 13TO3191R (low note) and 13TO3190A (high note). FIAMM identifies them as 7211222 (low note) and 7210222 (high note). The factory horn relay works just fine with these. The horn is not ignition switched so it is active all the time. There is a dedicated 10-A fuse for the horn in the relay box in the engine bay near the air filter.
Installation
1. Remove front bumper. The details of the front bumper removal depend on the year and model of your car. Generally you perform the following tasks, but please refer to your service manual for the details for your particular model. Place the front end of the car on jack stands and remove the front wheels. Remove some or all of the front undercover panels, including those covering the active aero system if your car has that. Remove the splash shield inside the fender in front of the wheel. Remove the fog lights. Remove the license plate bracket. Remove the combination lights, and for 1994 and newer models remove the headlights. Remove the nuts and bolts attaching the front bumper and slide the bumper cover off the car. I found it easier to work without the bumper reinforcement bar installed so I removed it also. The reinforcement bar is held on by 4 bolts on each side and only weighs about 12 pounds (my car). The front bumper cover weighs about 18 pounds (my car).
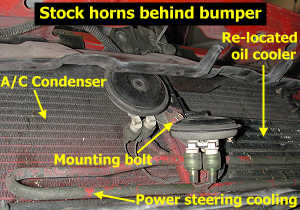
2. Remove stock horns. Unplug the horns from the wiring harness. Just pull the female bullet terminals off the horn. Remove the 12-mm mounting bolt and the horns.
3. Prepare new horns. Make a set of jumper wires for each horn out of 2- to 3-inch 16- to 14-gauge, multistrand, insulated wire, bullet male terminals, and the FIAMM-supplied female quick disconnect terminals. Attach the jumper wires to the horns. Wrap the terminal connections with electrical tape to protect them against dust, dirt, oil, and water (not done yet in the picture above and to the right). Loosely attach the brackets to the horns (so they can still rotate); the end with the small hole attaches to the horn.
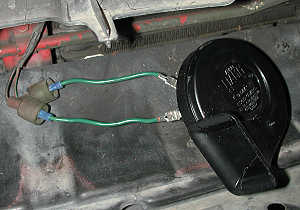
4. Install new horns. Place each horn separately on the frame's mounting bracket to determine how you want to position the horn's mounting bracket; then tighten the bolt on the back of the horn. Attach the horns to the car using original mounting bolt and frame bracket. Plug the jumper wires into the wiring harness. After testing the horns, wrap the connections with electrical tape. I used cable ties to secure the extra wire to the horns' mounting brackets.

5. Install front bumper. Perform the reverse of the removal steps for your front bumper.
Page last updated July 23, 2002.