Engine Swap - 1994 TT Engine into a 1991 TT
by Erick Van De Burg
(Web page design and editing by Jeff Lucius)
Ok, since there seems to be a lot of confusion and bad information on the topic I decided to do a write up. This past summer I swapped a motor from a '94 stealth RT TT into a '91 RT TT. Note: some things may be different on the '96+ TT or '92-'93 motors. This is just a basic guide and what I had to do to swap a '94-'95 motor into a '91 TT car. Im not going to talk about removing and re-installing the motors themselves, John Adams has already done a nice write up on how to do that. Unfortunately, I didnt take pictures of everything while the swap was being done, so if someone else does this swap or has pics please share. Here is my write up. Everything here you want to do when you have both motors out and next to each other.
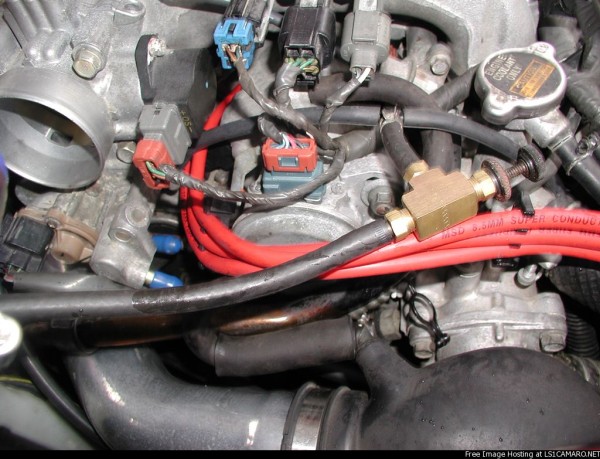
The first order of business is the cam angle sensor. In the later years Mitsubishi switched from a combined cam and crank angle ignition sensor (single housing) to a separate cam and crank angle ignition sensors. This swap can be done in one of two ways. You can either hack apart and rewire the harness to work with the crank sensor or you can simply swap the sensors. I chose to swap the sensors. Mitsubishi made this very easy and painless to do. [Editor's note: If you want to wire the 1993+ separate sensors into the 1991-1992 harness look at this diagram. However, using the 1991-1992 CAS allows adjustment of basic ignition timing advance.]
The heads of the '94+ TT motors retained the hole and slotted cam of the first gen motors. Simply mark on the sensor bracket the position of the cam sensor by drawing a straight line from the bracket onto the sensor itself. I used a paint pen because it wont rub off easily. Remove the sensor and unbolt the bracket. To install it on the new head, remove the small bracket that goes over the plug where the cam angle sensor is going to go, it is at the rear of the passenger side of the head. Now remove the rear valve cover and pullout the black plug where the sensor is going to go. With the valve cover still removed, install the sensor bracket from the old motor onto the new head. With the valve cover off still, slide the cam angle sensor into the bracket and line the sensor up with the slot in the cam (this is much easier to do with the valve cover off), it should kind of pop in. You can turn the little rotating bar on the sensor all you want; youre not going to hurt anything. Now realign the marks you made on the sensor bracket and on the sensor. Tighten down the sensor, remove the components for the crank angle sensor and youre done. To remove the crank angle sensor you will have to pull the lower timing belt cover and crank pulley. Hopefully youre installing a new timing belt and need to take this off anyway. Unbolt the sensor and remove the ties holding the wiring in place on the belt cover.
Make sure after you get the car running that you re-check the base ignition timing. Marking the sensor should get you close enough to start the car but doesnt mean the time is where it should be. Base timing should be between 5 and 7 degrees advance at 700-800 rpm. Make sure you know the correct method of adjusting the ignition timing before doing it. Its not like adjusting the distributor on a old chevy. [Editor's note: See 2-ignition-timing.htm and 2-cas-91-92.htm.]
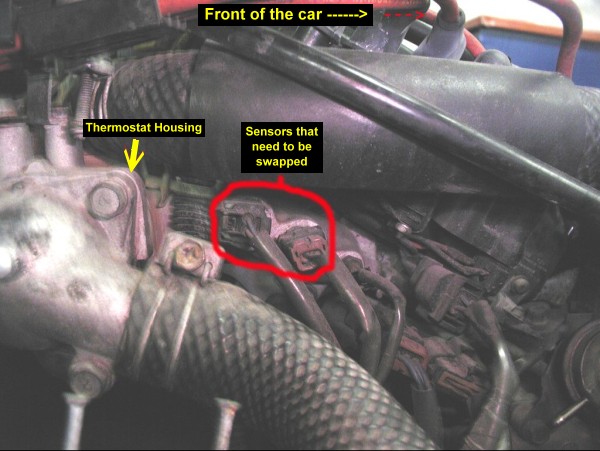
Now for the sensors by the thermostat housing (see picture below). On the '94 motor there are only 2 sensors here but the plug for the third is still there and one of the sensors is different, it wont plug into the wiring harness of the '91-'93. [Editor's note: See 2-coolanttemp.htm.] Remove the 2 sensors circled in the picture from your old motor and remember which one goes where, if youre like me you might want to do one at a time. Clean off the threads of the sensors to be installed and either coat them with permatex or wrap them in sealant tape. Remove the plug and the sensor that needs to be swapped and reinstall the sensors from your old motor. The sensors on the motor I did were in there very tight and may take some muscle to get them out. Now thats done.
When you removed your old motor I hope you simply unbolted the a/c compressor from the motor. It doesnt take very long and you wont have to recharge the system when youre done. Anyway, on the 91 motor (once again this may be different on other years, look and compare) the a/c compressor bracket is different than the '94 compressor bracket and wont work with the '91 compressor. This is the heavy iron bracket on the front drivers side of the motor. Remove the bracket from the old motor and swap it to the new motor. Now thats done, youre almost there.
From '91 to '94 they switched the type of belts used on the motors. In 91 they used a v-belt, '94+ they used the belt like a serpentine belt (cant remember if thats the name for the name or not). This means you can either remove the power steering pump and alternator from the old motor and use the '94+ components, swap the pulleys and tensioner, or you can just swap the alternator, crank pulley and power steering tensioner from the old motor to the new. I chose to swap the crank pulley, alternator and power steering tensioner because I had it all off anyway and didnt have to remove the lines from the power steering pump (which you hopefully unbolted from the motor and left the lines connected while you were removing the motor) but its entirely up to you. Now thats done.
Now that the easy stuff is done onto the rear pre-cat. On the '94+ cars the rear pre-cat is different in the way that the down pipe of the exhaust and the rear pre-cat bolt up. Now you could just use the '94+ down pipe. If you bought a long block then you probably dont have the down pipe for a '94+ sitting around or in my case the '94 DP was practically welded on with rust and had to be cut off. Getting the rear pre-cat off can be a pain in the ass even with the motor out of the car. First remove the heat shielding from around the rear turbo to gain access to the bolts for the pre-cat. There is also a bracket, with a stud and nut, going from the block to the rear pre-cat. You probably will want to spray this nut with PB blaster quite a while in advance, while this is only a little nut, its probably very rusted like mine was and the risk of breaking the stud off is very high. Remove the remaining 4 nuts that hold on the pre-cat and do the swap. Make sure you keep track of which pre-cat goes where and check the condition of the gaskets. It is 10x more of a PITA to this while the motor is in the car. If you have a stock DP you could skip this step by ordering a '94+ DP. If you already have a aftermarket downpipe I would swap the pre-cats.
So thats it! Unless I forgot something, that was all I had to do to do the swap. The motor runs great no CELs. No need to swap wiring harness and ECUs or any of that crap unless you are going from an NA to a TT but thats an entirely different matter. Feel free to hit me up on aim or email me if you have any questions.
AIM: Mad Hatter VR4
Email: Diamondstars@yahoo.com
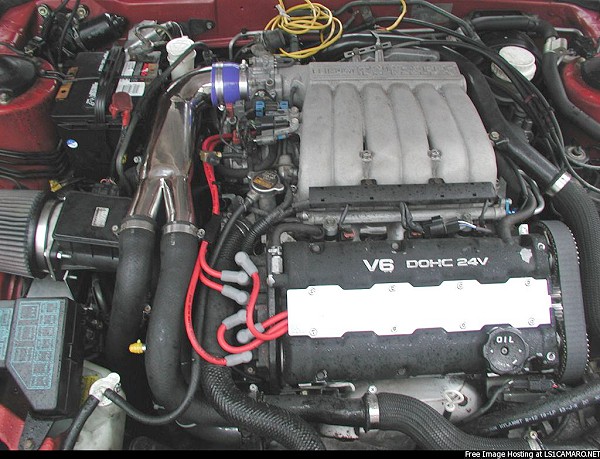
Below a picture of a 1994 TT engine installed into Asus's 1991 Stealth TT.
Page last updated October 13, 2004.