Door Trim Panel Removal
on the Mitsubishi 3000GT/Dodge Stealth
by Jeff Lucius
Introduction
Read all of the instructions and look at all of the pictures before you begin. The tools required are a #1 and #2 Phillips screwdrivers and a 1/8" slotted screwdriver. I either replace screws and bolts in their holes after a part is removed or I use plastic storage containers or bags to keep all the little parts sorted and not lost. All pictures are placed near the end of this note.
The door panel must be removed to replace or service the following items.
- Door speaker
- Door speaker cover
- Power window and power door-lock controls
- Handle for closing door
- Accent trim panel near top of door panel
- Door window defroster
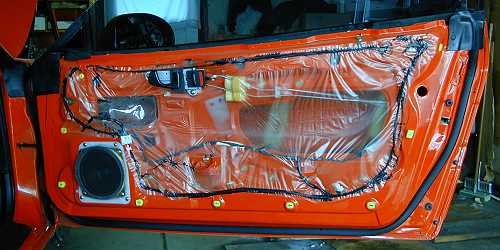
- Waterproof film
- Door glass regulator or power window mechanism
Removal
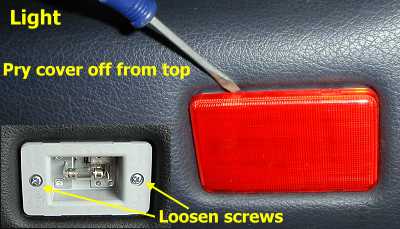
1. Door light. Gently pry off the light cover with a 1/8" slotted screwdriver or similar tool. Loosen (they do not need to be removed) the two Phillips screws in the light mounting bracket. Pull the light assembly out and press the release lever on the connector to remove the electrical connector.
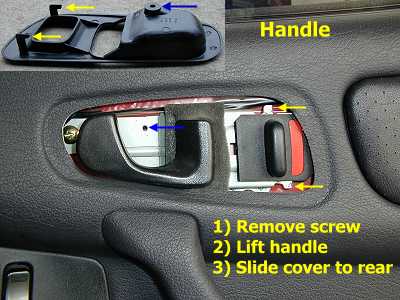
2. Door handle cover. Remove the Phillips screw (1/2", small head, black). Lift the door handle. Lift the front of the cover and slide the cover to the rear to remove.
3. Door trim carpet. Remove the Phillips screw (1", small head, black) at the rear of the carpet. Start at the rear, and with your hand under the bottom and behind the carpet panel, gently pull out on the carpet panel. There are two clips that must release. Slide the panel to the rear to remove it from the door panel.
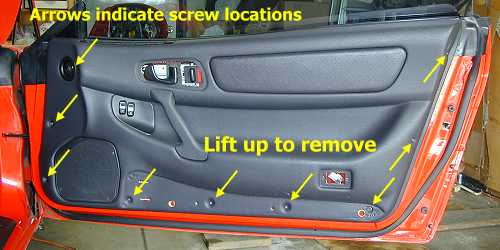
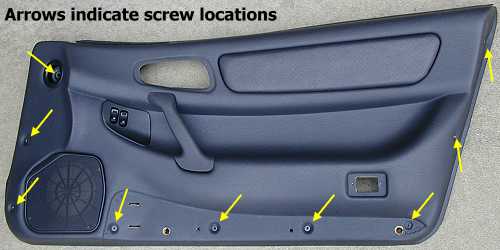
4. Door panel screws. Gently pry open the caps on the two screws near the front of the door panel. If you look closely at the cap you can see where the cap is hinged. Pry opposite this point. On my door, one of these caps already had the hinge point broken. This is no big deal. The cap will snap back on just fine. Remove these two screws with their plastic caps. Remove the screw (1/2", large head, black) from the defroster opening. Remove the three screws (brass) from the base of the panel. Remove the two screws (3/4", small head, black) from the back of the door.
5. Door panel. Lift up on the door panel to slide the two angle brackets on the back of the panel out of their slots, and to release the five clips located on the top back of the panel. Once released, pull the door panel toward you a little and reach behind to disconnect the electrical connector for the power window and door switches (there is a release lever on the switch).
Installation
For installation, just reverse the steps above. Note that there are five clips on the top back of the door panel, along with the two angle brackets, that must be inserted properly. Place the panel next to the door and reconnect the electrical connector for the switches. Insert the lower angle bracket into its opening on the door. Be sure the electrical harness for the light protrudes through the opening. I found it much easier to align the five clips on the top of the panel if the window was down. So turn the ignition on enough to lower the window if it is not already down. Now push the top of the panel close to the door, being sure the upper angle bracket is close to its small opening in the door. I had to apply a little pressure near the upper angle bracket to make it go in as I also pressed down a little on the top of the panel. There are five openings in the top of the door that the five clips go into. The long part of the clip goes into the middle of the openings. With the window down you can manipulate the top of the panel to align the clips properly. Check the upper angle bracket through the inside door handle opening and pull on the handle a little to be sure both brackets are secure. Re-attach all the screws after the clips and brackets are properly inserted. Add the door trim carpet and its single screw. Add the door handle cover and its single screw. Check the operation of the window.


Page last updated March 17, 2002.