Clutch Hose Replacement
on the Mitsubishi 3000GT/Dodge Stealth
by Jeff Lucius
Overview
The clutch hose is the only flexible line in the clutch hydraulic system. This hose should rarely need replacement, but if it does, these step-by-step instructions will guide you through the process. I performed this procedure after my clutch hose developed a pin-prick-size hole. Close inspection with a 10-power hand lens showed no sign of abrasion or any reason why such a small hole would develop. Nevertheless, the clutch hydraulic system would not hold pressure and the clutch would not release. I now carry a small patch of rubber tire inner-tube, small hose clamps, and utility knife for on the road repairs. The tools needed are the common ones that should be found in your in-car tool bag: 1/4"x8", 5/16"x12", and 3/8"x16" flat-head screwdrivers; #1 and #2 Phillips-head screwdrivers; 10-mm and 12-mm sockets with extensions and wrench; pliers; and 10-mm and 17-mm open-end and 10-mm flare-nut wrenches. You will also need a 3/16" ID clear flexible hose about 12" long; a small plastic container about the size of a 1-lb margarine tub; a new clutch hose (Mitsu part number MR151526, "Hose, clutch release cylinder", about $10 from Tallahassee Mitsubishi); and a fresh container of DOT3 or DOT4 brake fluid (6 oz is more than enough, about $1.50 for 12-oz at your local grocery or car parts store). All pictures are located near the end of this article.
Pre-removal
These steps worked for me and my modified MAS/air filter setup. You may have to make some small change for your particular intake setup. You will need to remove the battery so make sure you have any security codes that may be required for devices such as the radio. Step 1 here may be the only essential one, depending on how limber you are.
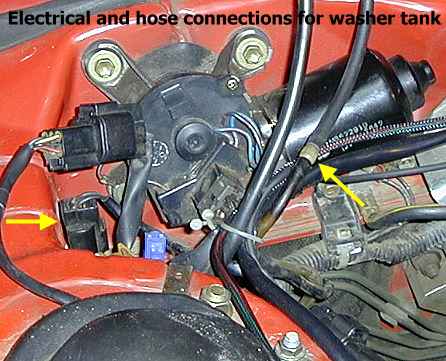
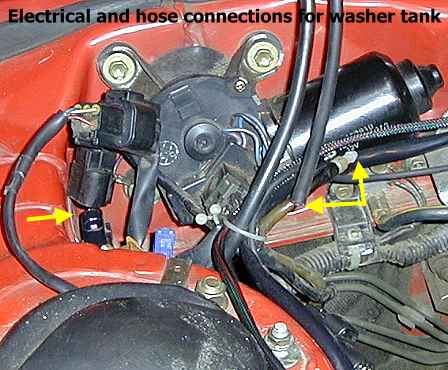
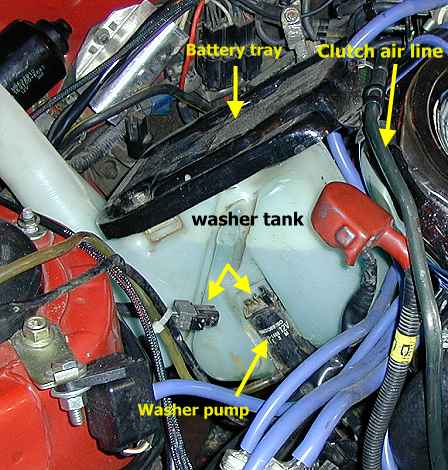
1. Battery, tray, and washer tank. Disconnect the negative battery terminal first (always!). Then disconnect the positive terminal. Both are 10-mm nuts on the stock connectors. Remove the hold-down bar (10-mm nuts again). Lift the battery out of the car. Remove the four 12-mm bolts near the corners of the tray. Disconnect the washer electrical connector and fluid hose near the passenger's-side strut tower. See the pictures below. Lift the battery tray and washer tank out part way and disconnect the washer pump electrical connector (see picture). Remove the tray and washer tank from the car. Keep the washer fluid hose high to avoid spills. Clean your hands and tools if you suspect battery acid got on them.
2. MAS and air filter. Remove the intake air filter and the mass air sensor. This is a simple as just loosening one hose clamp for my ARC2 setup. It is a bit more complicated for the stock setup or K&N equipped cars.
3. Clutch vacuum pipe (AWD cars). Remove the metal pipe that runs across the corner of the battery and then down below the MAS. There are spring-type hose clamps at each end plus a bracket at the front end (12 mm bolt). In addition, a sliding clamp was attached to the battery hold-down bar.
4. Intake hoses. For turbo cars, remove the Y-pipe, the main intake hose that the MAS connects to, and the intake hose to the rear turbo (I leave the vacuum hose attached to the intake hose and disconnect it from the stock boost controller solenoid). I am not sure if the intake hose and resonator will be in the way for non-turbo cars.
For the turbo cars, now is a great time to inspect the compressor wheel on the rear turbo, to check all the vacuum lines, to replace that stock BOV or check the seals on that aftermarket BOV. For all cars, the fuel filter is also easy to get to now, as well as the ISC motor on the throttle body.
Removal
You may find it much easier to work around the clutch hose and release cylinder if you tie hoses and cables out of the way with some string. In addition, a disposable rag under the hose area will help contain the fluid that leaks out. Be sure to clean your hands and tools if you get hydraulic fluid on them, the fluid may damage painted parts of your car or engine.
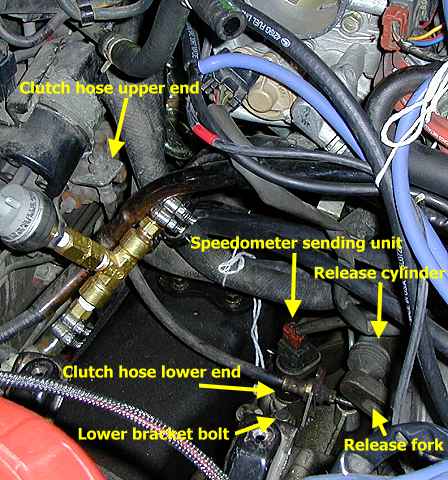
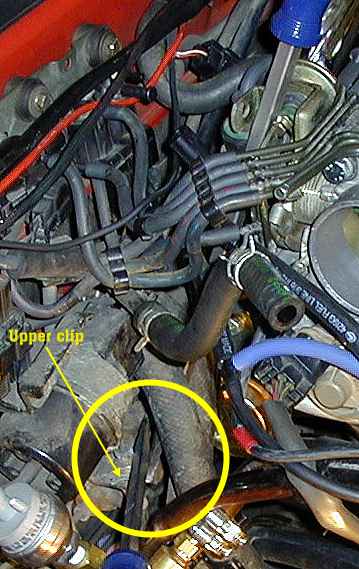
1. Upper end. I started with removing the retaining clip first rather than removing the flare nut to avoid working in the hydraulic fluid. Two flat-head screwdrivers can be used as shown in the picture below to pry the clip loose. Just pry it loose enough that you can finish the removal by hand. Then use a 17-mm open-end wrench on the hose fitting and a 10-mm flare-nut (or open-end) wrench on the flare nut on the hydraulic pipe. Remember the right-to-tight rule for tightening nuts, bolts, and screws. As Gomer Pyle used to say (or was it Goober) "righty tightey, lefty loosey". Fluid will drain out of the pipe after the upper end of the hose is loose.
2. Lower end. For the bottom connection, loosen the flare nut on the curved pipe (clutch tube the manual calls) that goes to the release cylinder. For AWD cars, remove the 12-mm bolt that holds the retaining bracket for the lower end of the hose and remove the hose and bracket together. For the AWD car bracket, there is a washer below the bracket that you must be careful to not drop. For FWD cars the arrangement may be a little different; I have not worked on them. Once off the car, the retaining clip can be easily removed.
Installation
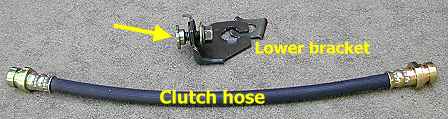
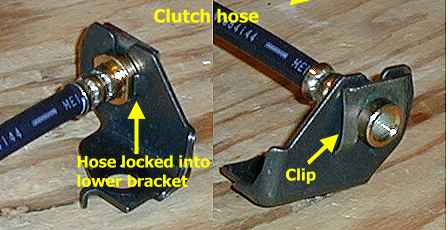
1. Lower end. Assemble the hose and lower-end bracket off the car. The hose is symmetrical so you can use either end. See the pictures below. Slide the hose onto the release cylinder pipe and bolt down the bracket. Do not tighten the bracket bolt too much, just a little by hand. Start the flare nut by hand as far as you can then use a wrench to finish with 11 ft-lb of torque (15 Nm). Now finish torqueing the bracket bolt to 13 ft-lb (19 Nm) of torque.
2. Upper end. The hose will mount only one way to avoid twisting it. Slide the hose through the bracket so that the fitting is locked in and will not twist and onto the pipe. Carefully get the retaining clip started onto the hose above the bracket. I used a 16" flat-head screwdriver and hammer to finish pushing the clip in completely. Tighten the flare nut by hand as far as you can then use a wrench to finish with 11 ft-lb of torque (15 Nm).
Clutch hydraulic line bleeding
Any time that air has entered the clutch hydraulic lines, or if the fluid is dirty or has absorbed water, the lines must be bled. This operation both removes air bubbles in the line and flushes out the old fluid. Use a new, unopened container of brake fluid with a DOT 3 or DOT 4 rating. Brake fluid is hydrophilic, meaning that it will readily absorb water from the air or by direct exposure. For the $1.50 it costs for a 12-oz container, it is not worth using fluid from an opened container (except in emergencies). This process also goes much easier with two people.
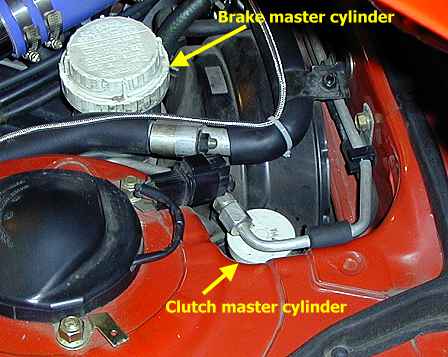
1. Clutch master cylinder. Locate the clutch master cylinder near the driver's side back corner of the engine bay (see picture below for AWD cars). Stuff disposable rags or paper towels around the cylinder and remove the lid (just pull up). Carefully pour some fluid into the cylinder. leave the top off.
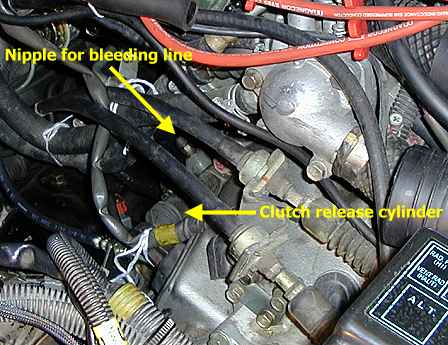
2. Release cylinder. Locate the bleeder plug on top of the cylinder and carefully remove the cap. Place a small container (such as a 1-lb margarine plastic tub) on the cross member. Attach a clear 3/16" (4-5 mm) inside-diameter hose onto the bleeder plug. A piece about 12" long is plenty. Run the other end into the container.
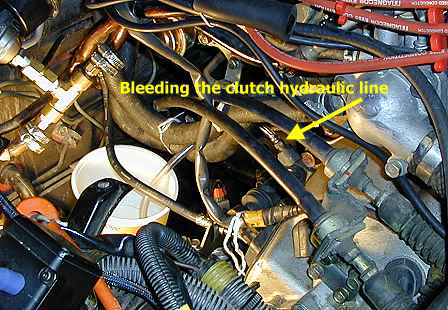
3. Bleeding. Place your assistant inside and establish some clear instructions. The assistant will press the clutch pedal down and hold it down until you tell them to let up. With the clutch pedal up, loosen the bleeder nut with a 10-mm wrench. Tell your assistant to press down on the clutch pedal and hold it down. If no fluid comes out loosen the nut a little more. If no fluid still comes out, close (tighten) the nut and tell your assistant to raise the pedal. Loosen the nut again and press and hold the pedal. Repeat these steps till fluid starts to come out. The pedal may be harder to push down than normal because the vacuum assist is not functional if the vacuum pipe was removed (AWD only).
Once you get to fluid to come out, keep repeating the following steps until no dirty fluid comes and no air bubbles come out. Open nut and press down on clutch pedal. Close nut and release pedal. If the pedal is released with the nut open, air may go back into the lines. Checked the fluid level in the master cylinder after every 3 or 4 open/close cycles and add more fluid if necessary.
When you are satisfied, close the nut one last time, remove the bleeding hose, and put the cap back on. I used about 4 oz of fluid total when I replaced my clutch hose. Remove the bleeding hose and tub. Put the cap back onto the master cylinder and throw away the rags that were stuffed around it. If you get any brake fluid on the car paint, your hands, or tools, clean it off immediately.
Post-installation
Follow the pre-removal instructions in reverse and be sure to connect the negative battery terminal up last.
Page last updated march 17, 2002.