Instructions for Changing the Power Antenna Pole
on the Mitsubishi 3000GT/Dodge Stealth
by Jeff Lucius
Overview
An inoperable power antenna pole seems to be a fairly common problem on our older cars. A broken rack cable most often causes it, which is the hidden, flexible, toothed, plastic cable that moves the antenna up and down. Replacing the antenna and cable (they are a single part, MR282623) is a simple procedure. The step-by-step instructions below show how. You will need to remove the antenna pole from the outside of the car and the antenna motor from the inside. You do not need to disconnect the battery, but you will have to remove plastic trim pieces in the rear storage compartment.
Preliminaries
You will need only two tools besides a replacement antenna pole, a #2 Phillips screwdriver and an 8-mm socket and ratchet. First you need to remove the antenna pole and check the length of the rack cable. Turn the radio ON and let the antenna extend as far as it can and let the motor stop running. If the pole does not extend or the motor does not run that's OK. Remove the ring nut at the base of the pole on top of the left rear fender. A slotted screwdriver and rag may be necessary to loosen the ring nut. Be careful to not scratch it or the fender. The pole and the cable should be greasy so you may want to wipe them off or wear old gloves. You should be able to tug on the cable and remove it. You may have to rotate the cable a little to free it from the motor. Once out, extend the cable (the antenna pole will retract) and measure it. The cable itself should be 44 inches (1117 mm) long. If it is shorter than that, some of the cable is broken off inside of the motor. If the length is OK, then go to the antenna installation section below and see if re-installing the pole (or the new one) solves the problem. If not, proceed to the next section. You can turn the radio and the ignition switches OFF.
Remove the rear and left trims
1. Remove the stuff from the luggage compartment. Fold down the rear seat backs and remove the stuff from the luggage compartment, including the retractable cover, the spare tire (how's that air pressure?), and both floor boxes. Remove the carpet (2 plastic push-in/pull-out plugs near rear seat) and the cardboard cover (2 Phillips screws in each hinge). I like to keep the bolts, screws, and miscellaneous parts for each piece together in a bag or container. You must also remove the rear and left-side (driver-side) trims. The trims are the vertical pieces that line the luggage compartment.
2. Remove the rear inside trim. It has 4 brass screws under plastic caps on top, 2 larger black screws at the base, 2 smaller black screws on the side, and 4 brass screws under the two lids. The piece should just pull straight out.
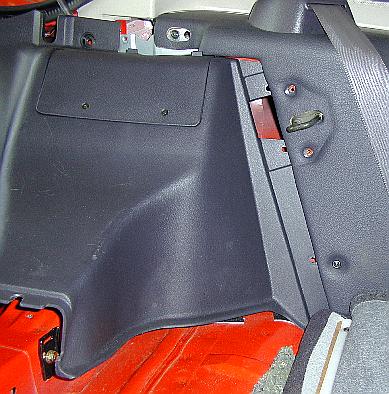
3. Remove the left inside trim. Remove the retractable cover bracket, and put the screw back into the body. Remove the cover over the back-seat, "U-shaped", latch bracket (2 black screws) and the black screw below the bracket. Remove the black screw at the base of the trim into the raised-up cross member. Remove the 2 black bolts under the plastic caps plus one more at the base. Now start at the back and gently pop it out. Then work your way toward the front, manipulating the piece around the hatch shock and out from under the panel in front of it.

Remove and replace the antenna motor
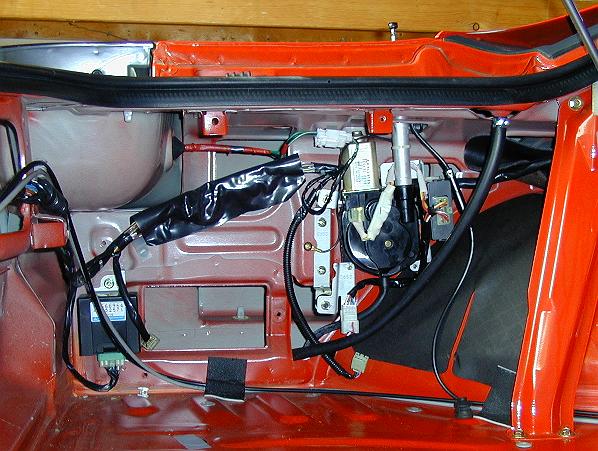
1. Remove the motor. Disconnect the electrical connector near the bottom. Unattach the ground strap from the body and put the screw back in the body. Remove the 2 bolts holding the motor bracket to the body. Unplug the antenna cable (it just pulls apart). Slide off the drain hose. If you are replacing the motor, just put the new one in now and skip to the next section.
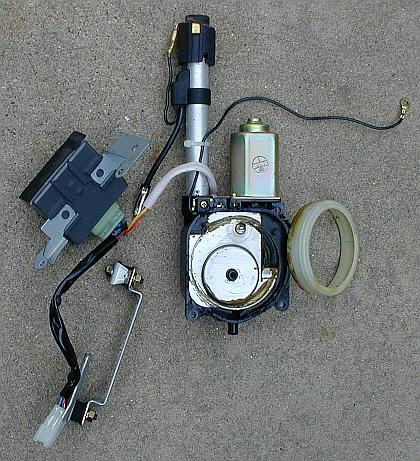
2. Remove broken off cable. Take the motor over to your workbench. Remove the cover. You may want to make a rough sketch of how the different brackets and pieces are attached to the bolts at each corner. Remove the 4 bolts at each corner. Remove the 8-mm nut near the middle of the cover. Carefully pry off the cover. There is a black sealant between it and the motor case; try not to disturb it. Remove the broken piece of plastic cable. Clean off any of the black sealant that may have gotten on the white plastic ring, but leave any grease that is there (add a little if dry). Put the cover and brackets back on.
3. Re-install the motor. Re-attach the drain hose and antenna cable. Apply upward pressure as you tighten the mounting bolts. Re-attach the ground strap and the electrical connector.
Install the antenna pole
1. Insert the pole. Turn the car radio ON. Let the motor run until it stops. With the cable teeth facing the luggage compartment, gently insert the rack cable into the tube until it stops against the motor gears. It will feel kind of spongy. Then rotate the cable 90º so that the teeth face toward the rear of the car. Very gently tug on the cable to be sure it has meshed with the gear. If it pulls out, then re-insert and try again.
2. Wind the cable into the motor. Have someone else turn the radio OFF (or run back and forth quickly) and guide the cable then the pole back into the motor. The top of the pole should be tight against the fender. If not, extend the antenna, remove it, and re-insert.
3. Test the operation. Turn the radio off and on to test. Some people lubricate the pole and cable; I just left the pole and cable as they came packaged (dry).
Replace the trims
Re-install the trim pieces using the above instructions in reverse order. Put the other stuff back into the luggage compartment. That is it!
Page last updated March 17, 2002.