3KGT Short Throw Shifter Installation
in the AWD Mitsubishi 3000GT/Dodge Stealth
by Jeff Lucius
Introduction
These instructions supplement the manufacturer's instructions for installing the 3KGT Motorsports Short Throw Shifter for the Mitsubishi 3000GT and Dodge Stealth. This installation is in a 1992 Stealth with the 5-speed AWD transaxle. The installation should be similar for the 6-speed AWD and 5-speed FWD transaxles. The tools and parts needed include pliers, a 14-mm socket and ratchet, and some multi-purpose grease. If you are replacing the boot at the same time you will also need some diagonal wire cutters and a cable tie. Please read through all the instructions before replacing your stock shifter.
The 3KGT short throw shifter, which sells for about $100, is developed and manufactured by Rasheed Behrooznia and Alcino Azevedo. They can be contacted at the address below or by email (rasheedb@3KGTmotorsports.com
).
3KGT Motorsports
7915 Silverton Ave. #307
San Diego, CA 92126
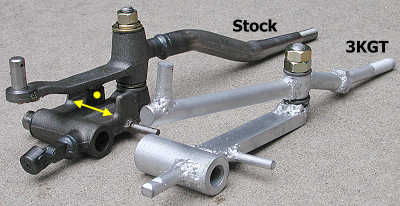
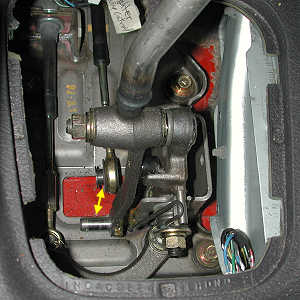
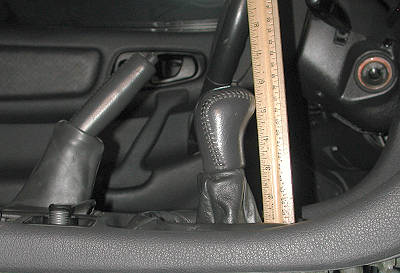
This shifter is a direct replacement of the stock shift lever in all models of 3000GT and Stealth (all years) and requires no modification to the car. The stock boot and shift knob are re-used. Throw is reduced by about 50% and shifter height is reduced by about 1 inch or so. The exact amount depends on the model year because the shifter changed slightly between models. The force needed to move the shifter increases a small amount. An important difference between the stock and 3KGT Motorsports shifter is the lack of shift stops. These are pointed out in the picture below on the right. The stops (indicated by the arrows) limit the range of movement of the small knob (indicated by the yellow dot) on the shift lever. I do not know yet how this will affect our transaxle. No problems have been reported by other users.
I installed the first version of the 3KGT shifter in the summer of 2002. On February 2, 2003 I installed their third version of this shifter. At the end of this web page I compare this newer version to the original. It is an improvement over an already fine product and is an outstanding value.
Installation
1. Park car. This procedure does not take a lot of time, maybe only 15 to 30 minutes if you are in a hurry. However, you will be placing the transaxle in neutral so be sure to engage the parking brake and perhaps block the wheels. This is one of the few upgrade upgrade procedures that does not require the battery to be disconnected.
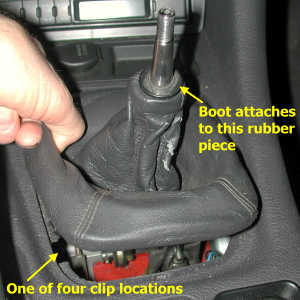
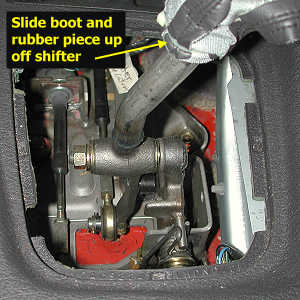
2. Remove shift knob and boot. Remove the shift knob by carefully rotating it counterclockwise and lifting up. Wrap your thumb around the inside edge of the plastic bracket that secures the shift lever boot cover in the floor console and lift up. There are four small plastic clips on the bracket that go into notches in the console. Pull the boot upwards till it turns inside out and exposes the cable tie that secures it to a thick rubber ring. Grasp the ring and pull it upwards until it slides off the shift lever. If you are replacing the boot, you can cut the cable tie at that this time or follow the boot manufacturer's instructions.
3. Disconnect control cable. Using pliers and your fingers, straighten then remove the cotter pin near the control cable. Save this cotter pin. Slide the control cable off the shift lever.
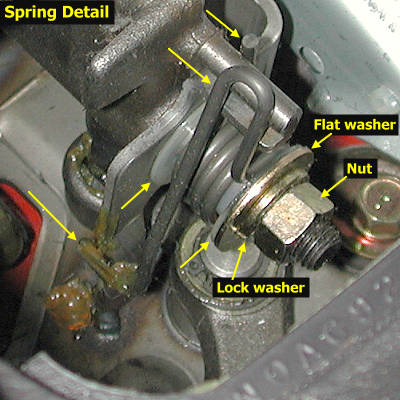
4. Remove pivot bolt. Take careful note of how the spring is attached and wrapped around the various pieces of the shift lever assembly. Loosen the 14-mm nut and remove it and its lock and flat washers. Push the bolt forward until you can grasp the head with your left hand. Continue pulling the bolt out with your left hand while your right hand grasps and cradles the spring assembly. Do not loose these parts; you need them all to install the new shift lever. Pull up on the shift lever and be sure the "cap" piece at the very bottom is still attached. Do not loose this part either. There is a metal bushing in the lever that may slide out.
5. Transfer stock parts. Remove the loose parts from the stock shift lever. The metal bushing goes into the new shift lever. The "cap" piece on the bottom slides onto the notches at the base of the new shift lever. By now, the spring assembly has probably come apart. It reassembles like this: slide the two plastic pieces into the spring so the flat sides are outward ("hat" is inward) and then slide the metal bushing into the plastic pieces. Don't worry too much about this, the spring assembly will come apart again when you install it.
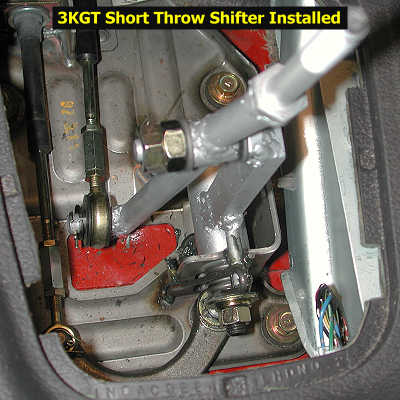
6. Install new shifter. Put a small amount of multi-purpose grease on the outside of the large metal bushing and insert it into the lever. If needed, add some grease to the "cap" piece on the bottom and slide it over the notches on the base of the lever. Partially lower the lever into the floor console. First slide the control cable end over the pin on the lever. Then finish lowering the lever into the pivot areas. Be sure the "cap" on the bottom is seated correctly. After adding a small amount of grease to the bolt, slide it through the lever from the front. Insert the cotter pin to retain the control cable and bend the ends of the pin. Now start to work on the spring assembly.
Slide the metal bushing onto the bolt. Slide one of the plastic end pieces over the bushing so that the flat side is up against the shift assembly bracket. Put the spring on over these pieces so that the loop is up and to the driver's side. Slide on the other plastic piece with the "hat" towards the spring. It may or may not be in the correct position; do not worry about this yet. Position the spring so that the single upward-pointing wire is on the right (passenger's side) of the flat protrusion. Holding the spring in place with one hand, grasp the "loop" with pliers and pull it to the left of the flat protrusion. The angular piece at the bottom of the spring needs to be to the left (driver's side) of the bracket. Now get the plastic pieces and bushing into their correct positions. The flat washer can help with this. The final arrangement should look just like the picture above (taken of the stock lever assembly before I removed it). Once the spring is correctly installed, add the flat washer, then the lock washer, then the nut. Tighten the nut but do not over-tighten it to the point that it makes the shift lever hard to move. I added some multi-purpose grease to the flat protrusion that separates the two spring upright pieces and to the lower angular spring piece that slides on the bracket.
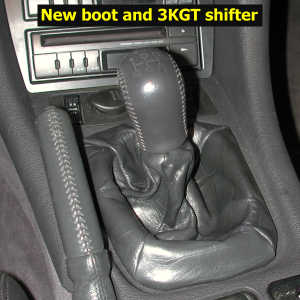
7. Install shift boot and knob. If you are re-using the stock boot, slide its inverted self over the lever, small end first. Lower the plastic bracket exposing the outside of the boot and snap the piece into the floor console. Note that the plastic bracket and opening in the console are not square and need to be matched up properly. If you are replacing the boot, follow the manufacturer's instructions to attach the rubber ring at the small end and the plastic bracket at the big end; then install the boot. Install the shift knob by sliding it onto the top of the lever and rotating it clockwise to engage the threads. Do not over tighten the shift knob. The top of the stock shift knob will be about 5 inches above the outer edges of the floor console.
Evaluation of 3KGT shifter (third version).
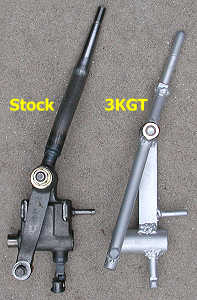
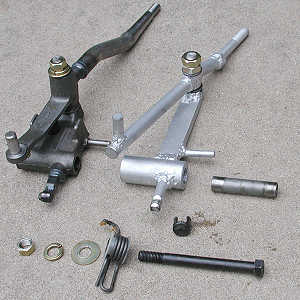
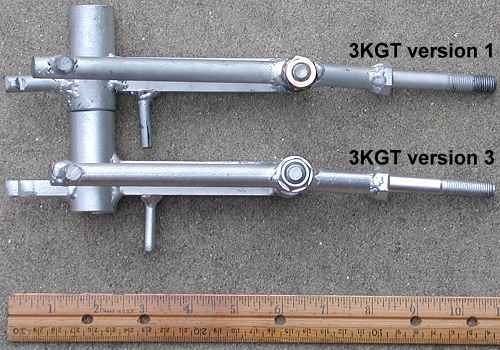
The picture below shows the stock 1992 Stealth TT shifter next to two versions of the 3KGT Motorsports short-throw shifters. The obvious differences are the change in lever ratio, lack of shift stops in the 3KGT shifters, and ~1" shorter lever height for the 3KGT shifters. The different lever ratio means the 3KGT shifter has a shorter throw than the stock shifter. The lever ratio is about 1.81:1 for the stock shifter (ratio of length of shaft above the pivot to the length below the pivot point) and about 0.85:1 for the 3KGT shifter. This means the 3KGT moves only 47% of the distance that the stock shifter does (0.85 / 1.81). For owners that have simply cut ~1" off the stock shifter, the lever ratio only changes to about 1.52:1 with throw changing to 84% of the stock throw. To achieve a 50% reduction in throw, the pivot point must be changed, as it is in the 3KGT and other true short throw shifters.

While the first version of the 3KGT shifter is a fine product, the third version is an exceptional product and an outstanding value at $90 (current sale price at the 3KGT website on Feb. 2, 2003). As described to me by Rasheed and from my own observations, the improvements in the 3rd version include the following.
- Additional threads for the shift knob and longer distance from top of the lever to top of the stop-nut for the boot.
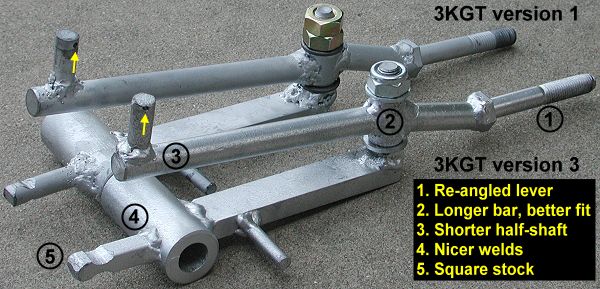
- The lever is angled a bit differently, bringing the shift knob a bit closer to the driver and slightly farther rearward. This may be a design change or a variation in production.
- Redesigned pivot location. The bar is longer and the fit tighter. There is less side to side play. It is also secured a bit differently.
- The shaft below the pivot is shorter with a slightly reduced distance between the pivot and the bar that attaches to the shifter cable. The hole drilled in that bar for the cotter pin is also located differently. This may be a design change or a variation in production. Either way, it is slightly more difficult now to insert the cotter pin.
- Overall quality has improved with much better looking welds and better attachment of parts. My shifter was painted silver, but 3KGT also paints them black. To me the color makes no difference because the shifter is not visible at all when the shift boot and knob are in place.
- The lower shaft that provides a pivot point for the whole shifter at its base is now made of square stock, rather than round stock. This short bar is notched to hold a small cap that pivots around the bar. In the shifter I received, this cap attached easily enough but would not pivot. I had to file the ground, narrow area and round off the end a little to get good movement from the cap. I mentioned this to Rasheed as my only complaint about his new version. He assured me that they usually take great care to pre-fit parts and check their function before shipping units. Mine was a very rare instance of an oversight. Regardless, this is something owners should check before installing this shifter (or any aftermarket shifter for that matter).
So, how does it drive? The first version was always a little stiffer than the stock shifter for me. This was OK because I really enjoyed the reduced throw. This latest version is a big improvement over the first version. It is as smooth as the stock shifter with little difference in force required to shift gears. I also like the reduced height of the shift knob.
Page last updated February 2, 2003.